My first card features one of the adorable treat bags along with lots more goodies from the Santa's List line:
Did you see that beautiful embossing on my card base? I used one of Teresa's new Ebosser folders to get the pretty embossed look. Once I ran it through my Ebosser, I added the burlap ribbon down the left side. I slipped a gift card into the treat bag and folded it over on top, tying it with a bit of green baker's twine to fasten it shut. I adhered it to the card front and then added the label sticker, the santa and ticket die-cuts to the front. I added my sentiment sticker (by SRM Stickers) and embellished it with a couple pretty enamel dots to finish it off.
I love the little touches of green! They really pop on that die-cut!
My next card is a quick one- I was inspired by the Santa from the "Santa" patterned paper:
I cut my paper so that Santa ended up on the left side of my front panel. I added a strip of the polka-dot patterned paper (Snowflakes) to the bottom edge and then added my sentiment sticker just above it. The red banner flag is from the sticker sheet and the kraft one is from the die-cut sheet. I added a sticker button to the top of that, tied with a black twine bow. Last, I added a green sequin for a touch of sparkle.
This Santa might be my favorite! He is so jolly and warm looking- just who I imagined when I was younger!
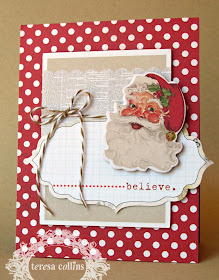
This card was also a quick one:
I started by covering my card front with a panel of red and white polka-dot patterned paper (Snowflakes). I punched out this journaling card and fancy label from the die-cut sheet and added them to my card front using dimensional foam adhesive. I tied a bit of brown baker's twine around it and added the Santa chipboard piece to the right side. I added dotting sticker (SRM Stickers) to the label to bring some emphasis to the believe and I was done! This one may have been the quickest of the bunch :)
I created a photo card as well- photo card are so fun to send! With the cute photo corners your family and friends will be able to take the photos off and use them elsewhere as well:
I started this card with a white card base. I added some of the red and white polka-dot pattern (Snowflakes) to the bottom 3/4 of the card front. I added a couple of border strips at the top of the patterned paper, as well as a bit of green cardstock. I wrapped it with some white twine and tied a bow to the left side. Next, I added a 3x4 photo using the decorative photo corners just to the right of the bow. I embellished with a couple sequins and added the die-cut tag with a handwritten greeting.
Now that I've gotten started on Christmas cards I can't stop! :) These were just so fun to put together and I can't wait to send them out to my friends and family with their gifts! I hope they inspire you to start yours, too!
Well, hope you are having a great day and thanks for stopping by!
-tessa


Adorable cards! And LOVING that photo of you guys!
ReplyDeleteVery nice! I love the one with the burlap - and the photo card is too cute!
ReplyDelete