Showing posts with label Future's So Bright. Show all posts

Thursday, May 30, 2013

You Brighten My Day Card

I can't help it- these stamps from Avocado Arts are just so easy to use!  I had to make one more card using their Future's So Bright set:


I teamed it up with the Simple Stories 24/Seven 6x6 pad again.  I stamped the lightbulb in yellow ink and drew over it with a yellow Spica pen to add some glitter.  Then, I stamped the sentiment in black.  Since I am creating this for a boy, I kept my embellishments simple and just added a little twine.


I wish you could see that sparkle a little better!  I'm going to have to work on my glitter photography skills :)

Hope you are having a great Thursday!  I'm taking it easy, hanging with my favorite two year old- we're going to build a fort and watch Scooby for a little while before we go play with bubbles outside!  He was so excited when he saw the bubbles!  I can't wait!

Thanks for stopping by today!

-tessa

Wednesday, May 8, 2013

Future is So Bright Cards for Avocado Arts

Good Morning!

Today I have another set of card for you using Avocado Arts' new Future's So Bright set! This set is seriously cute! This time I put a girly spin on them and love how they turned out!


This lightbulb stamp might be my new favorite!  I think it is so cute and love that there is a little heart inside!  For this card, I stamped it onto yellow cardstock and fussy cut around it.  I wanted it to be my focal point so I built my card with that in mind.  First I created a bright pink card base and added a white panel to the center of the front.  I stamped the stars with SU! Pink Pirouette ink in the background and then added a panel of patterned paper from the Sweet Girl 6x6 pad by Echo Park.  I cut a tag out of blue paper and stamped the rays on it with Versamark.  I embossed it using white powder.  The sentiment is stamped onto pink paper and cut out in a banner shape.  I added the lightbulb over the rays using a pop dot and adhered the tag to the card front.  I added the sentiment and finished it off with a little pink baker's twine at the top of my tag.


Don't the rays look great embossed?  I wanted them to really shine against that blue background and the white embossing was just the trick!

For my second card, I had something simple and fun in mind:


I chose some fun colored inks and stamped the shades image up the side of a white cardstock panel.  I simply added the sentiment and adhered the panel onto a bright pink card base to finish this one off!  It was so quick but I love how it turned out!


I have truly enjoyed my guest spot with Avocado Arts!  Thanks again for letting me stamp with you this month!  If you get a chance, check out their store and Facebook page- they share lots of fun things there!

Hope you have a great day and thanks for taking the time to stop by today!

-tessa

Thursday, May 2, 2013

Two Cards for Avocado Arts!

Good Morning!

I'm guest designing this month for Avocado Arts- a great company offering lots of fun stamp sets, printables, digital die cuts, card kits and a stamp club! They sent me their latest release, Future's So Bright to play with- it's lots of fun!  I created two cards to share with you today featuring this set.  Here is the first:


For this card I started by stamping the rays using Versamark in the background of my kraft card base.  I went over the image with my clear Stardust glitter pen to give it a little shimmer.  Next, I added my tag and paper strip and created the faux stitching. I stamped my light bulb and my sentiment onto colored cardstock and cut them out.  I adhered the sentiment first and finished my card by adding the light bulb with foam adhesive dots for dimension.


I so wish it had been sunny out when I took this photo so that you could really see the sparkle from that glitter pen!  At least you can see the other details. :)   I chose Jet Black Archival Ink to stamp the lightbulb and sentiment.  This ink is the blackest of blacks and I love the way it looks on colored cardstock!  I used a Signo White Gel pen to create the faux stitching.

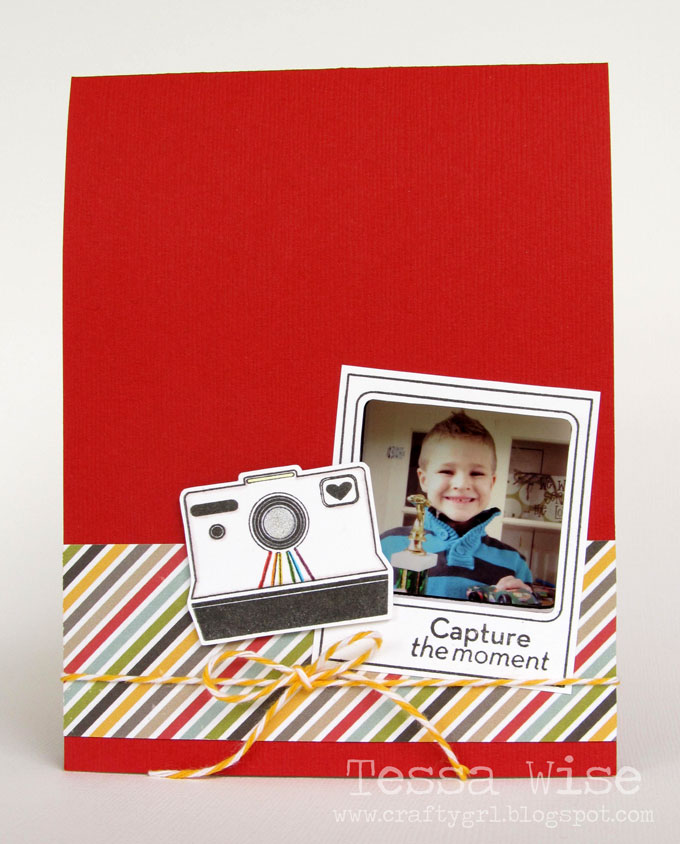
For my second card, I used the little camera image as well as the photo frame.  I thought it would be fun to use the frame to create a window in my card:


I created a card base out of red cardstock and adhered a strip of striped cardstock to the bottom.  To create the window, I stamped the frame onto my cardfront and cut out the center.  Next I stamped the frame and the camera onto white cardstock and cut them out.  I cut the center of the frame, this time leaving a little bit of an edge.  I adhered it over the other stamped frame, covering up all my lines.


You can see that I did add a little bit of color to the camera- I used some markers to color the stripes and grabbed my Stardust glitter pen again for the center of the camera lens.  I adhered the camera using foam dots.  I stamped the sentiment onto the frame and added just a bit of twine to finish off the look. 
   

On the inside, I stamped the frame again, this time adding a picture of my sweet nephew and his trophy to the center.  I added a little sentiment to finish it off.  I can't wait to write a little note in this one and send it off to my nephew!  He recently won this trophy for having the fastest little pine derby car around!  I think he'll get a kick out of seeing himself on the card!

I really enjoyed creating these cards for Avocado Arts!  If you'd like to see what other products they offer, check out their online store- there are lots of cute stamps including the Future's So Bright set that I got to use.  I'll be back on May 8th with another post featuring this fun set, as well!

Thanks for stopping by today!

-tessa

 
site design by designer blogs