Saturday, November 30, 2013

Glittery Fun Card Class Coming Up!

I'll be teaching a fun card class at Scrapdoodles on December 14th!  I'm showcasing the Elizabeth Crafts Designs goodies- they are soo fun to play with!  We will be focusing on techniques using their beautiful glitter.  Here are the samples we will recreate in class:

First up is a glittery birthday card:

Glitter Balloons Card 1

With this one, you'll learn just how easy this glitter is to color over using Copic markers!  It's a fun one!

Glitter Balloons Card 2

Doesn't it sparkle?  These glitters are so pretty!

The second card features the great snowflake diecuts:

Glitter Snowflakes Card 1

This one is my favorite!  I'll show you how to mask and glitter with different colors.  There's also a stripe technique hiding on this card!

Glitter Snowflakes Card 2

Love the blues and silver- they sparkle so much in real life!

My third card is a Christmas card:

Glitter Christmas Tree Card 1

You'll learn the ins and outs of glittering diecuts with this one!

Glitter Christmas Tree Card 2

I hope you'll be able to join us for class!  It will be great for beginner, intermediate, and expert crafters especially if you're wanting to learn about the great glitters from Elizabeth Crafts!  Here are the details:

Elizabeth Crafts Glitter Card Class
with Tessa

Saturday, December 14th at 1:30pm

$16.00

Please bring these things to class:  adhesive, pencil, scissors, bone folder, tweezers, paper piercer, course paint brush or other brush to use with glitter.

Hope you are all having a great holiday weekend!  Stop by the store to see the class samples in person along with all the beautiful Elizabeth Crafts products they have in stock!

-tessa

Friday, November 22, 2013

Inky Paws Challenge #5

Good morning!  I'm playing along with Newton's Nook Designs' Inky Paws Challenge today!  They had another fun sketch to work with:


I picked my favorite stamp set to work with, Frozen Friends!  I just love the cute snowmen in this set!  Here is my card:

Cocoa Snowman Card

I picked out some fun and bright papers from Bella Blvd to use for this one- don't you love the stripes!  After creating a pink card base, I stamped all over it using the largest snowflake and matching pink ink.  Next, I cut out the banner shape and added it to my card.  I had originally cut a panel of the black and white polka-dot paper to go in the background but it was such a harsh contrast, I decided to create a smaller piece and add it over the stamped panel instead.

For the stamped panel, I first stamped the snowman and colored him with my Copic markers. Next, I stamped the smaller snowflakes around him with my lightest blue ink.  I then added the black polka-dotted paper and sentiment strip.  I finished off the look with a bit of pink ribbon and linen thread.

Cocoa Snowman Card 2

I'm so happy I had time to play along this week!  The sketch is a fun one!  Thanks Jen for the inspiration! :)  Don't forget to hop over to the Newton's Nook Designs blog to see what the other designers created!  I hope you can play along, too!

Hope you have a great day!

-tessa

Thursday, November 21, 2013

A Merry Christmas Card

Hi There!  I'm home today with a sick little girl.  We're making the best of it, watching some fun movies and getting extra cuddle time.  Hopefully she'll be back to her normal self tomorrow.  That's probably the thing I like the least about this time of year- it's no fun when the bugs go around!  On the other hand, I love the holidays!

I made this card last night while watching a silly Christmas movie with my girls.  My friend JJ recently gifted me with these amazing stamps and dies from Avery Elle and I'm so glad she did!  They were so much fun to work with! Thanks again JJ!  Here is my card:

Merry Bells Card 1

I combined papers from Echo Park and Little Yellow Bicycle for this one. I used one of the Echo Park journaling cards for my main panel, stamping 'Christmas' just above the snowflakes.  Next, I die-cut the 'Merry' and added a panel of gray snowflake paper to the back of it using foam dots.  the bells are die-cut out of the pretty silver paper by Stampin' Up!  I embellished them with some of my favorite linen thread.

Merry Bells Card 2

I can't think of anything more fun than crafting with my girls while watching Christmas movies!  Maybe that's why I love this card so much!  It was made with lots of Christmas spirit in my heart! :)

I hope you're having a great day!  Thanks for stopping by!

-tessa


Tuesday, November 19, 2013

Some Memorabilia Projects for Teresa Collins Designs

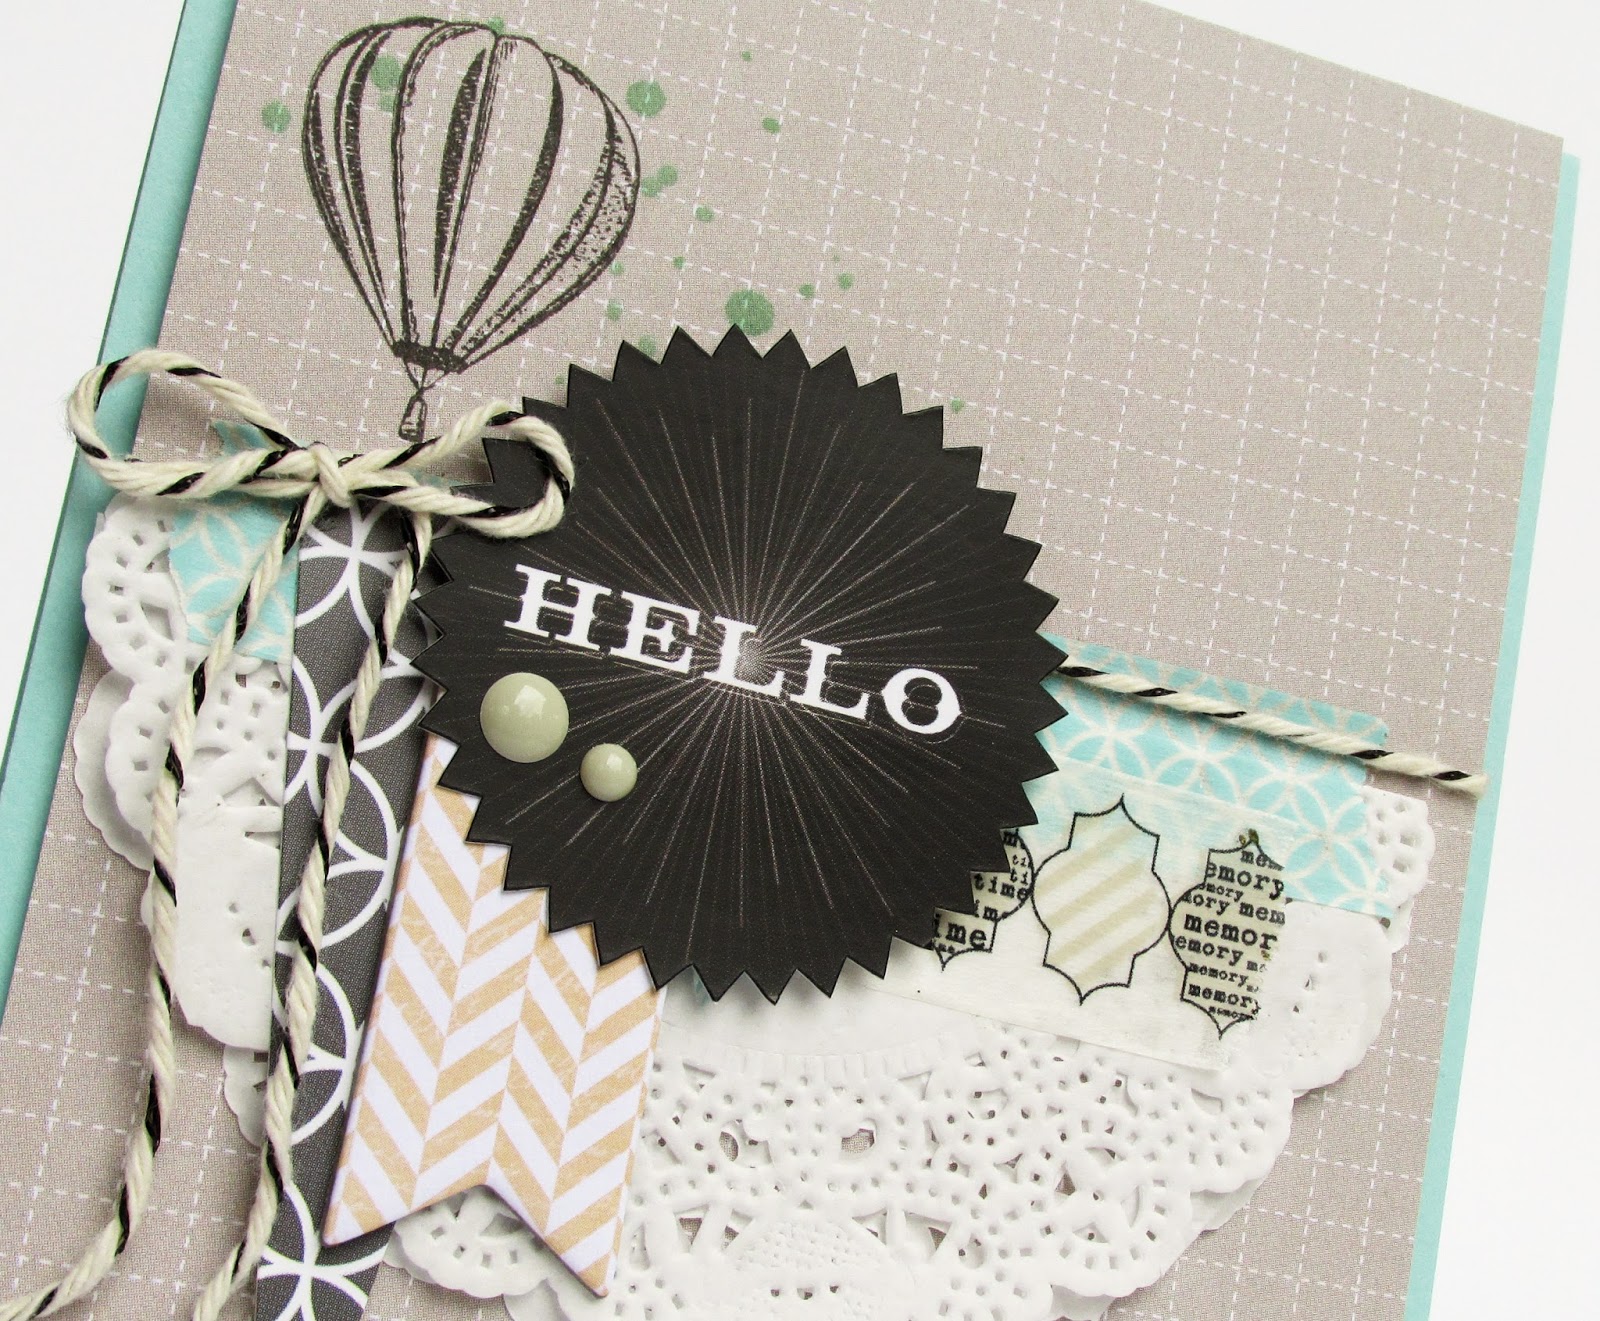
Hi!  It's my day to post on the Teresa Collins Design Team Blog and I thought I'd share my projects here, too!  Cards are my favorite thing to create so of course, that's what I started with this week when I had some time to craft.  I pulled out the Memorabilia collection and got to work! :)  First I made a collage style hello card:


Collage style cards are my favorite!  I love adding the layers and textures one at a time, building up into the look I'm going for.  With this card, I started with a pale blue card base.  Next, I cut a panel of the Document patterned paper and splattered it with mint colored mist.  Once it was dry, I stamped the hot air balloon from the Memorabilia stamp set.  Then I added my doily, folded in half and layered some Memorabilia washi tape over the seam.  I wanted to add some banners next- I chose two, one from the Memorabilia sticker sheet and one from the chipboard elements.  I added the twine next, tying it in a bow.  My last layer was the cute sentiment from the Memorabilia sticker sheet.  I added it to the card front with dimensional adhesive and embellished it with a couple of epoxy dots.  I finished by adding the panel to my card base with dimensional foam adhesive.


Aren't the layers fun?  :)  After I finished my collage style card, I wanted to do something simple.  The banners on the Recorded patterned paper inspired this one:


I cut a panel out of the Recorded patterned paper out so that the banners would run along the top of my card.  I stamped the sentiment (Lots to Say set by Reverse Confetti) in the lower right hand corner using Versamark ink and then embossed it with white embossing powder.  I flicked the panel with white mist and let it dry.  Once it was dry, I lightly sponged white ink around the edges of the card front.  Lastly, I embellished with the Memorabilia epoxy dots.


It's an easy to make card with a big impact I think!

After two cards, I was ready to create something a little different.  I grabbed a clear pillow box from SRM Stickers to decorate- it's the perfect size for a gift card or a small treat:


I started this project with some found items.  I tore a page out of an old book and wrapped it around the center of the pillow box.  Next, I wrapped it with some dark gray yarn.  I cut a heart out of the Quatrefoil patterned paper and added it to the center using dimensional adhesive.  The sentiment banner came next- it's from the Memorabilia die-cut sheet.  Lastly, I embellished it with some of the pretty Memorabilia sequins.  I just love them!


I really enjoyed creating these projects!  The smaller canvas of cards and goodie boxes is perfect- not too much space to fill and so fun to give away!

Thanks for joining me today!

Supplies Used:
Teresa Collins Designs: Memorabilia 12x12 papers, Memorabilia Sticker Accessory Sheet, Memorabilia Sequins, Memorabilia Chipboard Elements, Memorabilia Epoxy Dots, Memorabilia Decorative Tape, Memorabilia Die-cut Sheet
Other: Cardstock by Stampin' Up!; Twine by The Twinery; Sentiment stamp by Reverse Confetti; Clear pillow box by SRM Stickers; Doily by Stampin' Up!; Mists by Studio Calico and Dylusions

Thursday, November 14, 2013

Newton's Nook Designs November Release: Frozen Friends

Good morning!  Today we're celebrating a new release from Newton's Nook Designs!!

Continuing with the snow them, today we are showcasing the new Frozen Friends set.  Here is what I made:


The snowmen in this set are so adorable!!  I kept my card simple so that he would really stand out.  After stamping him with Memento ink and coloring him with my Prismacolor pencils, I simply added a strip of paper from the Front Porch line by Pebbles along with a stitched sticker by SRM Stickers.


I stamped some of the snowflakes on either side of him and then added my sentiment.  Easy and cute!  Hee!!  You can't beat that! :)

Would you like to win Frozen Friends?This set will be given away to Two lucky winners
Here's how to win: 
1. Comment on Newton's Nook Design blog: http://www.newtonsnookblog.com. One Winner will be randomly chosen from the comments on the November release posts.
2. Comment on the Design Team Member and Guest blogs (see list below)! One winner will be chosen at random from the collective blogs in the November release blog hop. Make sure to check out each of their blogs and comment for your chance to win. You will not know which blog has been chosen so the more you comment on the better your chances are of winning! You have until Thursday, November 14th at 9 pm Central Standard Time to comment  -- winners will be announced on the blog post on Friday, November 15th.
Make sure you check out all the blogs participating in the Launch Party below to enter:

Danielle Lounds (Guest Designer)

It's so fun to see what everyone created with this adorable set!  Make sure to stop by the Newton's Nook Designs blog to see what the team created!

Thanks for stopping by today!

-tessa

Wednesday, November 13, 2013

Newton's Nook Designs Novermber Release: Snow Days

Good morning!  It's time for a new release from Newton's Nook Designs!!

 This month is all about snow!  They are releasing two adorable sets and today's is called Snow Days.  Here is what I made with it:


This one was so fun to create!  Snow Days is a great set, full of cute images to color, fun sentiments, and lots of snowflakes!  I loved this little puppy- doesn't he look ready for some fun?  Hee!


I colored him with my Prismacolor pencils and then cut out around the top side of him, leaving the rest to look like a hill.  I popped it up over the polka-dotted background that I had stamped and embossed snowflakes on.  I added my sentiment and the wheeee! next and then added a sticker border from SRM Stickers.

Would you like to win Snow Day?This set will be given away to Two lucky winners
Here's how to win: 
1. Comment on Newton's Nook Design blog: http://www.newtonsnookblog.com. One Winner will be randomly chosen from the comments on the November release posts.
2. Comment on the Design Team Member and Guest blogs (see list below)! One winner will be chosen at random from the collective blogs in the November release blog hop. Make sure to check out each of their blogs and comment for your chance to win. You will not know which blog has been chosen so the more you comment on the better your chances are of winning! You have until Thursday, November 14th at 9 pm Central Standard Time to comment  -- winners will be announced on the blog post on Friday, November 15th.
Make sure you check out all the blogs participating in the Launch Party below to enter:

Danielle Lounds (Guest Designer)

The team did great with this cute set!  Make sure to stop by the Newton's Nook Designs blog to see what everyone created!

Thanks for stopping by today!

-tessa

Saturday, November 9, 2013

Thank You Cath!

Today along with so many card makers from around the world, we are celebrating a woman who can only be described as Moxie Fab!  Cath has been part of my everyday for many years, writing a blog called Moxie Fab World for Paper Crafts Magazine.  She updates it all week long, providing endless bits of inspiration and inspiring me to create pretty things.  It just won't be the same with out her!  I'll miss you Cath!


If you're following along with the hop, you've probably come from Lori Craig's blog.  There are so many people hopping along- what a fun way to say farewell to Cath!

I decided to share a card that I love today- it's cute and colorful and has a touch of sparkle!  All things that feel so Moxie Fab to me!  This one makes me smile:


The snowman stamp is by Darcie's Heart and Home.  The patterned paper is by Pebbles, Inc., and the sticker sentiment is by SRM Stickers.  The sequins were from the You Are My Happy collection by Teresa Collins Designs.  I used my Prismacolor pencils to color this little guy in and afterward, I added some glitter to the snowflakes around him.


 So, Cath, merriest of wishes to you!  I'm sure you're off to exciting things!  Thank you for the years of inspiration and challenges that have helped me become a better card maker!

There are literally hundreds hopping along with us today but please pop over to Courtney Kelly's blog next!  Thanks for stopping by today!

-tessa


site design by designer blogs