Tuesday, November 24, 2020

Thanksgiving Cross Stitch

wall art

I have two cute finished pieces to share with you today!  I love fall designs and finished these two cross stitch patterns over the last year.  They were small and fairly simple to work on but did contain a bunch of pretty varigated floss which can be pricey!

First up is The Thankful Owls by Bent Creek.  I fell in love with the owls on this one!  And, they are tiny enough to fit on a fork!  I had to stitch it :)

I used the called for floss and stitiched it up on a 32 count linen.  I can't recall the name of the color but if I remember, I'll edit this post to add it in.

cross stitch

I finished this one in this cute frame by Jillibean Soup.  I found it at my local Joann store.  I added a bit of brown floral fabric I had in my stash from when Stampin' Up! made fabric (remember that?).  I wrapped my cross stitch around a piece of sticky board and then matted it inside the frame.  Simple but cute!  I ended up displaying it in a tobacco basket I picked up at Target.  I add seasonal pieces here throughout the year- it makes a cute background for stitched pieces!

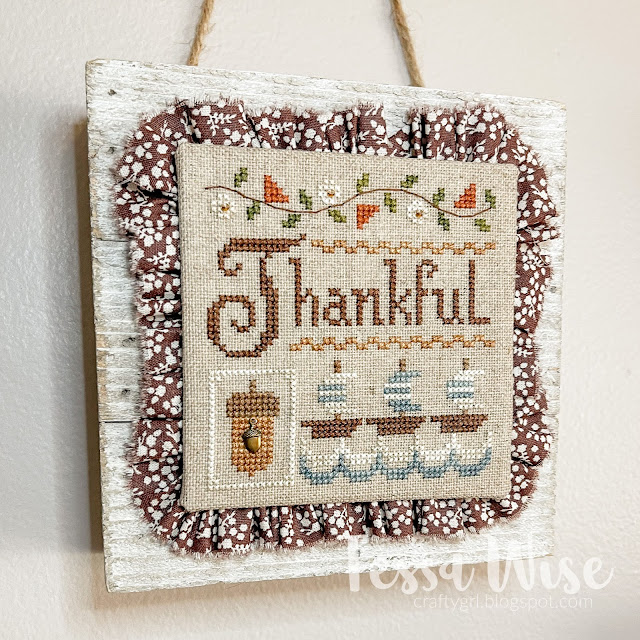
My second piece features A Little Thankful by Lizzie Kate.  I purchased this as a kit and it included a cute tiny charm and beads.  

cross stitch

This one is also finished on a frame by Jillibean Soup that I found at Joann.  I matted this with a ruffle of torn fabric I made using another brown fabric from my stash.  This one is also from the Stampin' Up fabric line from long ago...

cross stitch

I love how easy it was to create these pieces using the frames from Jillibean Soup!  I will be getting some more of these for sure!  I may need to update my fabric stash though, lol!  Most of my fabric is nearly vintage!

-Tess

Products:
Thankful Owls by Bent Creek
A Little Thankful by Lizzie Kate
Jillibean Soup Mix the Media frames

Monday, October 26, 2020

Halloween Cards

 Hi!

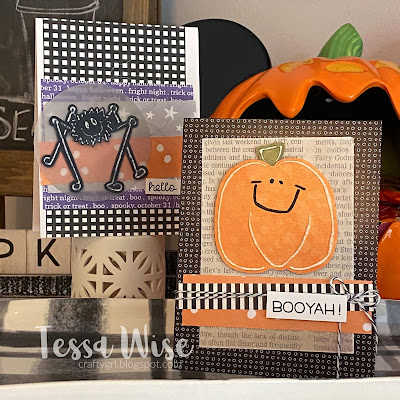
The week before Halloween means I'm sending out my most resent spooky card creations!  I haven't made many but I thought I'd share two that made me smile :)

halloween cards

These use a mix of goodies I have in my stash.  I created the focal points with Lasting Impressions brass templates.  Papers are from Lasting Impressions and Reverse Confetti.  The sentiments are stamps by Lawn Fawn.  

pumpkin card

I love the face on this guy!  So cute!  I used two different colored papers for him and used a black pen to fill in his smile and eyes.  I thought they popped more that way!

pumpkin card closeup

And the spider is a little spooky but silly at the same time!  He looks like he's ready to tap dance! lol!

Spider card

I layered him a bit with foam dots for dimension.  I love how glossy the Lasting Impressions papers are- they are so pretty and easy to work with!

spider card closeup

Halloween supplies always call to me!  I wish I had more time in the fall to create!  The beginning of the school year is always busy and my creative time just doesn't happen as much as I would like...

I hope you are enjoying the Halloween season!

-Tess


Friday, August 14, 2020

A Stitchable Donut Card

Hello and Happy Friday!  This is my last Friday off this summer!  Even though it was a weird summer that moved very slowly, here on the last day it feels like it sped by!  I am excited to be back to work though and can't wait to see my students, even if only virtually!

I created a few other cards for the Stitchables release from Waffle Flower Crafts earlier in the month.  I thought I'd share one of them with you today!

stitched card front

I used the Stitchable Circles Die to along the bottom of a white card base.  I stitched the donuts using DMC floss in a caramel brown and bright pink color.  I added seed beads from my bead stash to create the look of sprinkles.  The sentiment from the Stitched Sentiments Stamp Set was perfect for this card!

closeup of stitching

This stitched design was made into a free downloadable pattern.  Pop over to the Stitchables area of the Waffle Flower Shop to find it!

Off to enjoy my last Friday off!  Have a great weekend!


-Tess

Wednesday, August 5, 2020

Waffle Flower Stitchables Blog Hop


Hello friends!

I am so excited to be hopping along with the Waffle Flower team today!  For their latest release, Waffle Flower has merged two of my favorite crafts- card making and cross stitching!  Their new Stitchables products are so fun and innovative!

Waffle Flower’s Stitchable products are now available in the store!  In case you missed it, Nina introduced the beginner friendly Stitched Borders here, and the Pinking Shapes and Holiday Shapes for more experienced users. You can also find some Coordinating Products here!

I created two cards for the hop today!  I pulled inspiration some two patterns I stitched last year.  The first one is part of Hands On Design's Chalk Full: Harvest and inspired by Priscilla Blain.  I pulled one flower from the pattern to stitch on the Stitchables Pinking Circle Die.


I cut the die from black cardstock and gave it a chalkboard look with white pigment ink before I stitched the flower.  The design was meant to look like chalkboard art and I love that you can diecut any color paper to use with the Stitchable Pinking Dies.  Endless possibilities, right?  Here is a closer look:


This was stitched using overdyed threads by Gentle Arts Sampler Threads and Classic Colors.  I also used the new Stitched Sentiment Stamp Set for the sentiment and stitched with my sewing machine on either side of it to keep with the theme.

My second card features the smallest llama from the Llama Lump pattern by Plum Street Samplers.  I stitched him up on some linen textured kraft cardstock cut with the Stitchable Pinking Rectangle Die.  


This was also stitched using overdyed threads from Gentle Arts Sampler Threads, Classic Colors, and Weeks Dye Works.  You can really see the varigation in the grass and the llama's fur :)


The sentiment is also from the Stitched Sentiments Stamp Set.  The simple hello is perfect for this card!

These dies really sparked my imagination to think up a bunch of fun things to do with them!  I can't wait to share some of the other things I've been stitching soon!

More Blog Hop Goodness

Giveaways:

For today’s hop, Waffle Flower is giving away $25 gift certificate to THREE lucky winners. You can leave a comment on this blog and along the hop by 11:59pm EDT on August 9th, 2020 for your chances to win. Winners will be chosen at random from the comments left on any of the posts in this blog hop and will be announced on the Waffle Flower Blog on 8/12/2020.

There are more giveaways to enter on our Instagram! Follow us at @waffleflowercrafts so you don’t miss out! 

Specials:

From now till August 7th, 2020, all orders over $50 placed at waffleflower.com will receive a free Cloud Storage Magnetic Board (you can find the 5-pack here).

A kind reminder from Waffle Flower:"We appreciate every order we receive but we also recommend at this time of uncertainties, reserve your resources and use what you have first! Stay positive and healthy!"

For those of you who are new to Waffle Flower, they have a Last Chance section on their website that lists many goodies for 25% off until they are gone! This would be a great place to start your collection!

This release really is the best of both of my favorite crafts!  Thank you for visiting today!

Monday, July 20, 2020

Progress on Big Red Ship of Life

Cross Stitch Closeup

Cross stitching has been my main crafty focus for a few years now.  Although I used to cross stitch when I was young, I picked it up again after finding all sorts of intresting and modern patterns on Etsy!  I started working on a few fan art projects and then moved on to some more intricate designs.  I found a wonderful cross stitch community on social media which also helped with the obsession!  Currently I have 31 works in progress (WIPs) that I am working on.  

One of my most favorite projects is Big Red Ship of Life.  This beautiful pattern was designed by Ink Circles.  Here is a cover photo of the finished piece:


I started this in 2017 and have been working on it here and there over the years.  Instead of stitching with one color thread for a monochromatic look, I chose to create a colorful ombre' using Fiberlicious silk flosses in the Ocean Sunset collection.

Cross Stitch work in progress

I worked my way from the bottom up, changing colors every 25 rows or so.  I also feather slightly so that there isn't too harsh of a line between the colors.  I have completed 2-3 colors a year so far and currently am about half way done!  Beautiful reds, oranges and yellows are left to fill in the top.

Cross Stitch Closeup

Before I started stitching, I planned out the ombre effect.  I took the vertical stitch count and divided it by the number of colors I wanted to use.  That number gave me the stitch count for each color.  I stitch 23 rows of each color.  To take the harsh line between colors away, I choose a few stitches above and below the line to intermix with the next color.  I call this feathering.  The next picture is a closer look so you can see this.

Cross Stitch Closeup

I am excited to get back to this!  I am currently trying to complete some of my projects (WIP down) so that I have around 20 current WIPs.  30 just seems like too many!  Once I WIP down a few more, I will pull this project out again.  I am in no hurry to finish it!  I absolutly love working on it and hope it lasts forever! :)

Do you have any projects that you will be sad to finish because you love working on them so much?

-Tess

Supplies:
Big Red Ship of Life by Ink Circles
Antique White 32 count Linen by Wichelt- a full yard
Fiberlicious Silks- Ocean Sunset Collection


Tuesday, July 14, 2020

Crochet Baby Yoda

Finished amigurumi

Anyone else have a pile of crafts they started during quarantine???

I am sure there are some people out there who can relate when I say I had a moment of start all the things in my craft room!  One project that I had been wanting to make was this cute little crochet amigurumi piece featuring The Child (Baby Yoday).  I might be a little obsessed with Baby Yoda, lol!

Amigurumi head on a skein of yarn

I found this adorable pattern on Yarn Society through Pinterest.  Her instructions are amazing!  Pictures of many steps plus you can scroll through so you don't forget your place.  Many of her patterns also include a full video tutorial on YouTube.  Like I said- she is amazing!

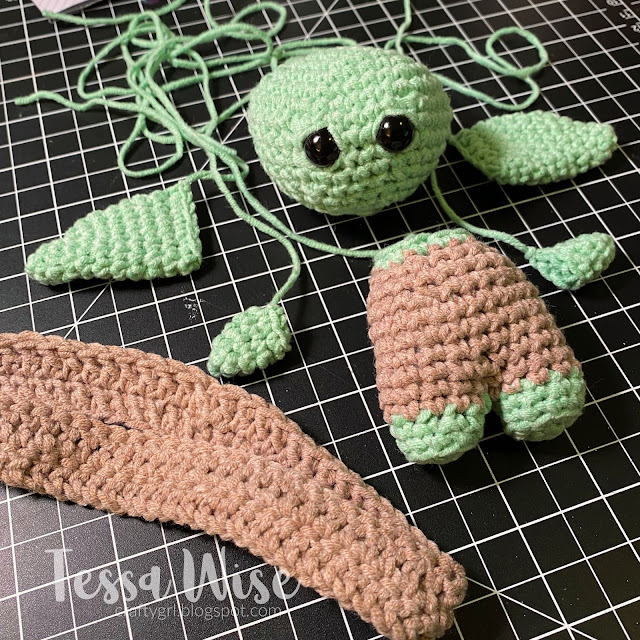
Parts of a crochet amigurumi

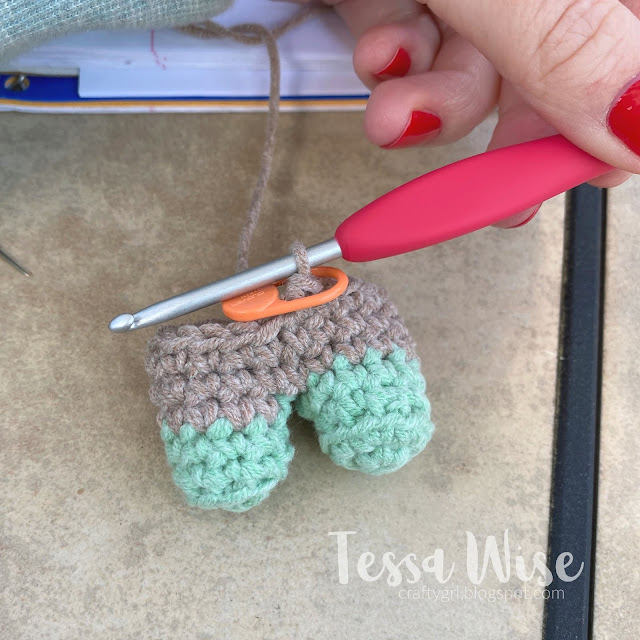
I found yarns in the correct colors at Michaels- it was the only local store open at the beginning of quarantine.  I chose Rich Mint and Almond Crisp.  Almond Crisp has three different tones of brown so I had the cream and tan in one skein.  I used an E crochet hook for my Yodas.  I picked up safety eyes in an assortment from Amazon.

Part of a crochet amigurumi

I ended up creating two of these- one as a gift and one for myself.  I would say a beginner could do it with the help of YouTube for unkown stitches or terms.  I hadn't crocheted in many years and had a pretty easy time getting the hang of it.

Crochet amigurumi in pieces

Creating Baby Yoda has jumpstarted my love of crochet again!  I will have a few more crochet projects to share soon- like I said, I had a crazy case of start all the things, lol!

-Tess


Tuesday, July 7, 2020

Disney Love- Epcot, December 2019

Christmas tree in American pavilion in Epcot

Over Christmas we travelled to Disney World for an improptu holiday trip.  We needed a little holiday Disney magic!  Over the last three years, we have spent time at Disney over the holidays so we were expecting the crowds and long wait times.  We are usually okay with that since our schedules only allow for travel at Christmas time or summer.  

Family traveling selfie

We stayed at the Coronado Springs resort for our first time.  The new Gran Torino Tower was beautiful!  I loved the architeture and details!  We enjoyed the lobby and surrounding areas very much.  Our room was in an older area but seemed like it had also been recently updated.  We loved the Three Amigos theme!  It also had an amazing pool area.

hotel front

fountain in lake

pool

After arriving and unpacking a bit we headed over to Epcot.  Epcot is usually our first day choice because we don't feel like we need to have a long day in this park.  Our favorite thing about Epcot is the food!  During the holidays they host the International Festival of the Holidays and we enjoy walking around to all the booths to try different things!  

family selfie Epcot

Christmas tree sushi

poutine

Chocolate cocktail and cake

food

man with beer flight

asian style fries

We have a few favorite rides in Epcot including Soarin' and Mission: Space but I prefer to spend time walking around in Epcot.  We only rode a few rides this time around.  Since we travelled early, we also went back to the resort before the fireworks.

Spaceship Earth, Epcon

It was a great first day in the parks!  We loved all the different foods we tried- especially the poutine, asian fries, and sushi.  We can't wait to see what our next trip to Epcot looks like- hopefully we can plan a trip soon!

What is your favorite Disney park?  Do you have a favorite time to visit Epcot?

-Tess
 
site design by designer blogs