Showing posts with label Teresa Collins. Show all posts

Thursday, December 11, 2014

Golden Peace on Earth Card

Good morning!  I have a pretty card to share with you today done in white and gold:


I've combined some pretty stamps from Newton's Nook Designs with patterned paper from Teresa Collins.  I stamped the snowflakes from the Beautiful Blizzard set with gold Delacata ink- everything is so sparkly in real life!


The sentiment is from the Holiday Wishes set.  I stamped it onto the raised white panel with Versafine ink.  I embellished with more gold- sequins and thread- and just a pop of turquoise with solid baker's twine from SRM.

This one was so fun to stamp! I love the gold and the sparkle!
post signature

Tuesday, December 9, 2014

Three Tinsel and Co. Christmas Cards

Hi!  I thought I better share some more of the Christmas cards I've made before Christmas actually gets here lol!  Today I'm sharing three cards I had created for Teresa Collins Designs over the summer.  These are using the beautiful Tinsel and Company Line:


I embossed the red card base with Beautiful Words embossing folder.  The journaling card has been stamped and stitched along the outside edge.  I kept the embellishments simple, adding a diecut along the bottom edge and a few sequins here and there.


This next one is crisp with a little bit of messy :)


I used embossing paste and a stencil to create the large damask on a white card base.  I splattered it with gray ink and then started layering elements on.  Some are stickers, some are diecuts, and some is just paper- it's fun to mix it up a bit!


 This last one was a quick one:


I covered my white card base with the pretty stars patterned paper (from the 6x6 pad).  I added the three star diecuts and then added the sentiment diecut.  I used dimensional foam adhesive here and there to make things stand out.  I simply added a few sequins for accent  and called it done.


It was weird working on these in the summertime- I actually pulled out some Christmas movies to get me in the mood!  lol!  It was fun!

Thanks for stopping by today!
post signature

Wednesday, July 23, 2014

Tinsel & Company Christmas Cards

Hi!  Today I am sharing on the Teresa Collins Design Team blog- I thought I'd share here, too!  I had a chance to play with the new Tinsel & Company collection over the weekend and made a couple of cards.  My favorite part of the collection is the gold foil printed patterned paper.  It's so shiny and pretty!  Perfect for holiday cards!

My first one features the gold polka-dots on kraft patterned paper (Dots Paper) along with a couple die-cuts from the Tinsel & Company Ephemera pack:


Isn't that gold nice!!  The ephemera pieces are distressed looking- like old wooden signs.  I really love the look!  Here is a closeup:


I kept this one simple, embellishing a little with burlap and machine stitching.  Thank goodness for the Teresa Collins Clear Hold Adhesive by Xyron- it was the only thing that would keep this burlap ribbon in place!

My second card features some of the pretty stamps in the Tinsel & Company collection:


That sentiment stamp is sooo pretty!  I want to use it on all my Christmas cards this year!  Here I've stamped it with a pretty silver ink on a vellum journaling card.  It was hard to get a picture of the metallic shine but boy is it nice in real life!  Here is a closer look:


I've used papers from the Tinsel & Company 6x6 pad on this card along with an Ephemera Tag, a couple of Decorative Stickers, and some Sequins from the collection.  The stars on the card base are another stamp from the Clear Stamp set as well.

This collection definitely put me in the Christmas mood!  It has a classic look and will work so well for so many different projects!  I can't wait to pull it out again!

Thanks for joining me today!
post signature

Sunday, June 15, 2014

Waffle Flower Challenge- You Rock Card

Hi!  Today I have a fun card I made for the new Waffle Flower Challenge!  Waffle Flower Stamps will be hosting a challenge each month, starting on the 15th and running through the 25th of the next month.  You'll have over a month to participate with each challenge!  And, even better, there are two categories- a sketch and a technique to inspire you.  You can enter as many times between June 15th and July 25th as you want for your chance to win a stamp set of your choice!

I loved both the sketch and the technique challenges for the Waffle Flower Challenge June/July 2014  but chose the sketch to work with:


Isn't it a great sketch?  Here is my card:


I used the Rock My World stamp set to stamp out 5 different rocks.  For the larger ones, I used the back of the stamps that had writing on them.
I used a technique I came up with to give them the texture of real rocks- I started by inking the stamps with a light colored ink and stamping off.  Next, I splattered ink and mists onto the stamp surface and then huffed on the stamp.  I stamped them on to white cardstock and cut out around each rock.
I stamped my sentiment on to the largest rock using black ink.  It's a mixture of two sentiments from the set.


Along with the Waffle Flower Rock My World stamp set, I used some patterned paper and epoxy dots from Teresa Collins Designs, a faux stitched sticker by SRM Stickers, and inks and mists from Stampin' Up, Heidi Swapp, Studio Calico, and Dylusions.

I'm so happy to be part of the first Waffle Flower Challenge Design Team!  Nina is so creative- I love her stamps and her style!  I can't wait to see what challenges she'll create next! :)  I hope you'll pop over to the Waffle Flower blog to see what the rest of the team created and to play along if you have a chance!
post signature

Friday, June 13, 2014

Stencilled Thanks Card

Hello!  Hope you had a good week- we were so busy but in a good way :)  Almost done with school here and I have a feeling my days will only be getting busier once the girls are home for the summer!

I thought I'd pop on today and share a card I made recently.  I used a familiar color scheme and technique- it was fun and I love how it turned out:


I started out with a white card base and then used my hearts stencil and paste from Teresa Collins Design's Basically Essential line.  Once the paste was dry,  pulled out some of my favorite blue Stampin' Up! ink pads and watercolored over the paste with a wet paint brush.  I splattered a bit of my favorite blue, Pacific Point over it as well.
Next I pulled out the Basically Essential 'thanks' stencil and used black paint to stencil the word on to a transparency sheet.  I cut it into a banner flag and pulled out some fun embellishments to go along with it.
I layered everything where I wanted it and then sewed over all the embellishments to hold them in place.  I used a mixture of stitches for an interesting look.
I finished it all off with a bit of aqua baker's twine along the top edge.


I think this is my favorite color scheme right now!  It feels so summery and beachy!  Maybe I'll make a beach themed card with it next :)

I entered this into the Simon Says Stamp Wednesday Challenge this week- it's all about stencils!

I also wanted to say thank you to everyone who cheered me on through the Paper Crafts and Scrapbooking Magazine's Gallery Idol Contest.  I didn't make it through to the finals but I'm so happy to have been part of such a fun group of girls!  They are all truly talented and I can't wait to see who wins this year!

Well, I hope you're enjoying your day!  Thanks for stopping by!
post signature

Monday, June 9, 2014

A Squiggly Hello Card

Hi there!  I'm happy to be sharing this card today- it's my entry in Round 4 of Paper Crafts and Scrapbooking Magazine's Gallery Idol Contest!  I'm so excited to be part of the top 10 contestants!!

Our challenge this round is to use border stamps in a fun way.  Now, I have to say, I rarely use border stamps- in fact, I only have 2 full sized border stamps (part of regular sets) and a set of sentiments.  That's it!  Luckily they worked together quite well and I came up with this:


The loopy border stamp is from the Love a la Carte set by Newton's Nook Designs.  After creating a white card base, I stamped the loopy border in a chevron pattern down the card front using 6 different Stampin' Up! blue inks.  Once the card front was full, I pulled out a small paint brush and watercolored over each squiggly line with the same color ink.  I splattered a little Pacific Point ink over the card front and let it all dry.
Next, I created the top sentiment panel of the card.  I used the Avery Elle Custom Panel Dies to cut it into a v-shape.  I stamped the sentiment from the Handwritten Borders set by Simon Says Stamp using Pacific Point ink along the edge of the panel.
The ribbon, gold sequin trim, and gold striped vellum are from Stampin' Up!.  The sequins are by Teresa Collins Designs and I got the twine from SRM Stickers.   I love the mix of gold and blue, don't you?


This card was so fun to create!  I love how the watercoloring softens the stamped image and gives the card movement.  I can't wait to try out this technique again!

I'm so happy to be part of the Gallery Idol top 10- pop over to the contest page to check out the other entries and to vote for your favorite!!  Voting ends this Thursday at noon.

Thanks so much for stopping by today!

post signature

Monday, June 2, 2014

Be Awesome Card for Gallery Idol Round 3!

Hi!  I am so happy to be playing along with Round 3 of Paper Crafts and Scrapbooking Magazine's Gallery Idol Contest!  This round is all about stencils!  I love playing with stencils and had lots of fun with this challenge!  I pulled out my all time favorite stencil sheet for this card:


I think the days of the week stencil from the Basically Essential stencil pack #2 by Teresa Collins Designs is so cute!  I was inspired to use it because of this fun sentiment by Mama Elephant.  It was sitting on my desk and I thought they'd be a perfect pair!

I used  the Basically Essential modeling paste by Teresa Collins Designs over my stencil and let it dry.  Next, I pulled out some of my Stampin' Up! ink pads and watercolored over the days of the week using 2 colors for each day.  The bright colors are so pretty and vivid in real life!  I love the way they look over the kraft card base.

I cut a piece of vellum into a circle and then stamped my sentiment using Staz On ink.  I added a scallop border along the bottom (Lawn Fawn paper and Reverse Confetti die) and then wrapped a bit of twine from SRM around it, ending in a bow.  I added a few epoxy hearts from We R Memory Keepers to embellish my sentiment.


It has been so fun playing along with the Gallery Idol contest this year!  Thanks again for all your votes and cheer leading!  I love reading the kind comments you've left here, at the contest page, and on Facebook- they really mean the world to me!

If you'd like to vote for me again this round, I'd love it! Pop over to the Gallery Idol Contest page to vote and to check out the rest of the entries!  Such beautiful work!!

Hope you have a great day!

post signature

Friday, May 30, 2014

Mix Ins for Modeling Paste

Hi!  It's Friday!!  Hope you are ready for the weekend- I am!  I just found out that I'll be making a card for the next round of Gallery Idol!!  :)  I'm so excited I made it through to the next round!!  And funny enough- my cards today would be perfect for the next challenge- stencils!!  I'm happy with the category, now to create something fun with them!!

I have a couple of cards I created this week for the Teresa Collins Design Team Blog to share with you today.  These were so fun to create!  I did a little experimenting with the Basically Essential Modeling Paste before I got started, testing out mix ins!  This first one features some beautiful gold glitter:


I scooped a little paste out and mixed in some of this awesome glitter by Stampendous.  It created an awesome texture but you couldn't see the sparkle very well.  To fix this, I sprinkled more glitter over the top of the paste after I spread it onto the star stencil.  The glitter sticks so well and I love the dimension it adds to the paste!  Here is a closer look:


This second card features the paste mixed with paint.  I used 2 drops of coral paint to get this look.  The color stays pretty vivid!  It was fun to play with:


I spread it over the hearts stencil in a messy fashion.  Sometimes a perfect mess is just what a card calls for!  And you don't have to worry about mistakes either! :)

 
As far as the embellishments go, I kept it simple to let the artsy elements shine through.  I used the photo overlays from the Something Wonderful collection for my sentiments and embellished with some gold twine from the Twinery along with gold star sequins and washi tapes from the Something Wonderful collection.  These were a little tricky to photograph because of the transparent overlays...

Well, I hope you have a great weekend!  I'll be pulling out my stencils again-- I can't wait!!

Thanks for popping by today!
post signature

Monday, May 26, 2014

Gallery Idol 2014!!

Hello!  I'm so excited to post today!  I worked extra hard on a card this weekend because I'm participating in this year's Paper Crafts and Scrapbooking Magazine's Gallery Idol Contest!!  I found out on Friday that I made it through to the 2nd round.  We were given the challenge of creating a card using diecuts and only 3 days to work on it.  I know what you're thinking- diecuts??  Really- you think that's hard!  Well it might seem easy but it was also wwaaayyy easy to overthink!  I spent all Friday and Saturday working on another card that ended up being too overworked.  Then I woke up this morning and started with a fresh outlook.  I love how my final card turned out:


I started off my craft time by cleaning up my work area.  I found all of these diecuts in a pile of leftover and discarded items- do you save yours, too?  The happy is by Avery Elle and the hello is by Paper Smooches.  I loved how they looked together and grabbed a SRM Stickers glassine envelope to use as a base- these are great to add to card fronts to hold gift cards!

The feathers (Paper Smooches) are die cut out of Scor-Tape sheets and then glittered.  I dipped the tips into the gold glitter first, pressing it into the sticky and sprinkling just a bit down the die.  Next, I pressed my favorite glitter (Elizabeth Crafts Warm Diamond) over the entire feather.  It is so pretty and sparkly in real life!

The patterned papers are a mix- the background is from the new Something Wonderful collection by Teresa Collins, the coral and yellow watercolored papers are from Stampin' Up! and the aqua is from the Plus One collection by Amy Tangerine for American Crafts.

I added a bit of machine sewing and left my threads long to fill in some space beneath the glassine envelope.  I thought it needed just a bit of color so I added the heart brad by Teresa Collins Designs next.  Lastly, I added a Starbucks gift card to the inside of the glassine envelope for the lucky recipient!


The feathers are my favorite part!  I've wanted to make glittered feathers since I cut them a couple of months ago!  Really, anything glittered is my favorite lol!  Here is a quick video so you could see all that great glitter in action:


So, now that you've seen my card, pop over to the Gallery Idol 2014 website and vote for your favorite card!  The top twenty contestants have created some amazing projects!  Thanks for all your support and cheerleading!  All the kind comments here, through email, and on Facebook have been so thoughtful- I really appreciate them!
post signature

Friday, May 16, 2014

Embossed and Embellished Cards for Teresa Collins Designs

Hello and happy Friday!!  It's a rainy day here but that's ok- I'm busy prepping for a fun class I have tomorrow! :)  It's a good excuse to watch a movie and stamp too!

Today I want to share a couple of cards I created for the Teresa Collins Designs team blog this week.  I just love how they turned out!  Really, whenever I use my eBosser and TC embossing folders I love how my projects turned out! lol!  For these cards, I paired the embossing with the new Urban Market collection that is available now.

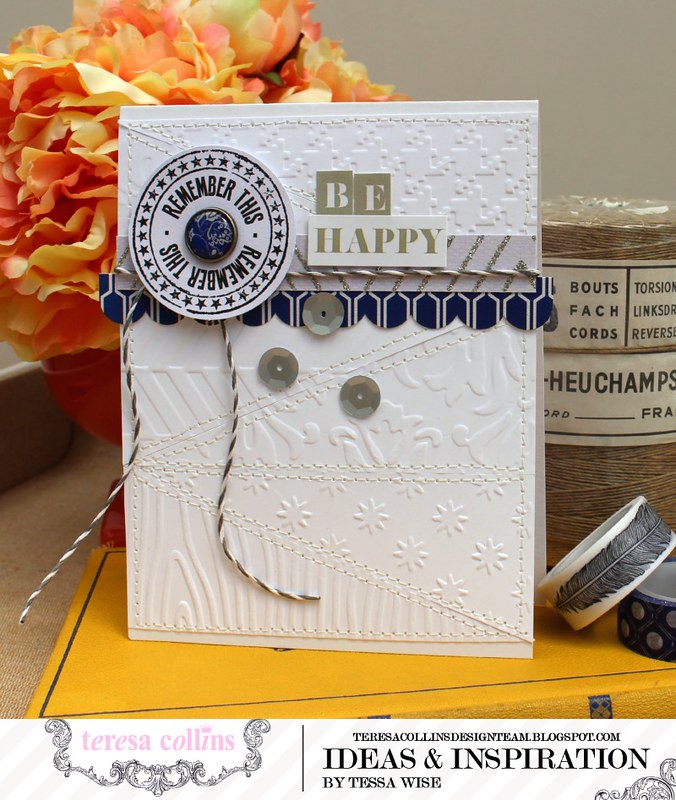
This first one was inspired by a triangle quilt I saw online.  I loved the stitched pattern and and although it was done in colorful fabrics, I couldn't wait to try an all white, embossed version of it!

TERESA COLLINS DESIGNS Be Happy Card 1

I started by cutting 6 4.25 x 1.75" strips of white cardstock.  I ran each of them through the eBosser using a different embossing folder.  Once they were embossed, I cut them in half diagonally to make 12 triangles.  

Starting at the bottom of the card, I adhered the triangles to a white card base using my Teresa Collins Mega Runner by Xyron.  I was careful to keep the adhesive in the centers of each triangle so I could easily sew over each piece.  Once they were all in place, I sewed around each triangle with my sewing machine to create the quilted look.  

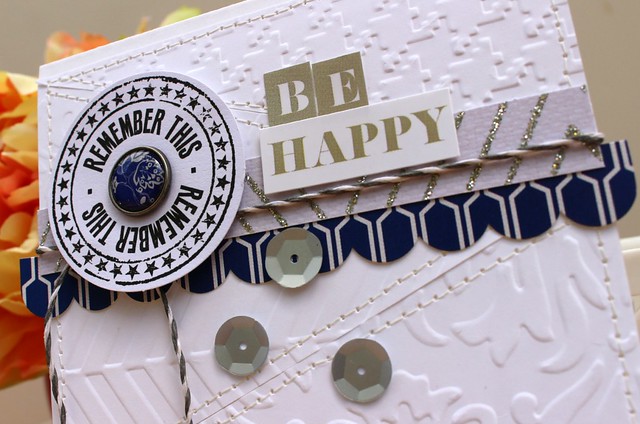
Once my embossed card base was finished, I added the embellishment cluster to the top of my card.  I started with the blue tiled scallop sticker strip from the Urban Market sticker sheet.  I added a strip of the glittered Zig patterned paper next and then tied a length of twine around the card.  I found the Remember This die cut circle in the Urban Market ephemera pack and embellished it with a blue floral brad from the Urban Market designer brads.  I added it to the card using dimensional foam adhesive.  I created the sentiment from the Urban Market Alpha and Label sticker sheet.  To finish off the look, I sprinkled a few sequins below the cluster.

TERESA COLLINS DESIGNS Be Happy Card 2

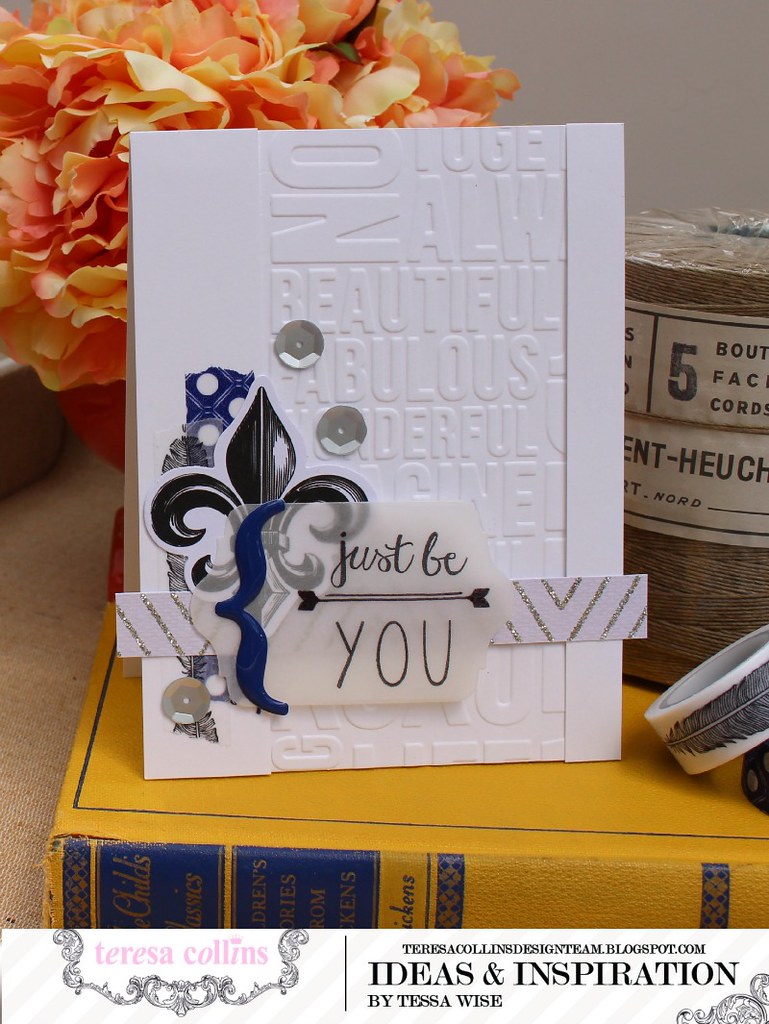
I have had this second idea in my head for awhile.  I love the look of an embossed strip down the front of a card but wanted to modernize it a bit.  This turned out exactly like I wanted it to:

TERESA COLLINS DESIGNS Just Be You Card 1

I cut a 5.5 x 2.75" panel of white cardstock and embossed it using the Beautiful Words embossing folder.  Cutting out the panel before you emboss means you can place the panel over the words you want to capture when you emboss.  I loved the list of beautiful, fabulous,  and wonderful so I placed the panel over this area of the folder and ran it through my eBosser.

I created a card base out of white cardstock and adhered the embossed panel onto the card 1/2" from the right side.  I then cut two strips of cardstock- one 5.5 x 1/2" and the other 5.5 x 1".  I used thin foam adhesive to add them to either side of the embossed panel.

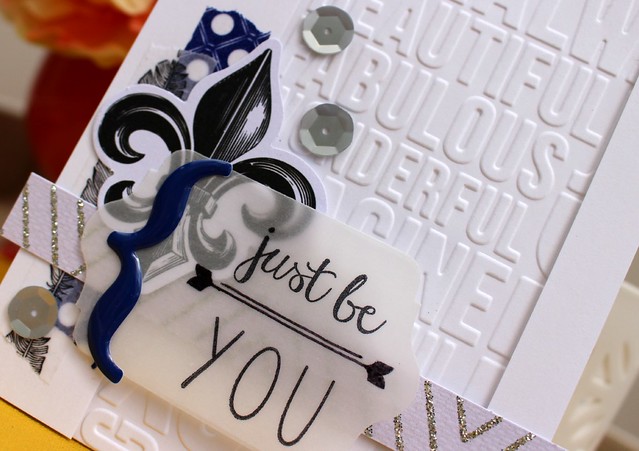
Next, I embellished the card with some of my favorite new products from the Urban Market collection.  I used the feather and blue tile decorative tapes on the left side first.  Then I added a strip of the glittery Zig patterned paper across the bottom.  I added the fleur de lis from the Urban Market ephemera pack and pulled out my stamps.  This sentiment is from the All About You set by Reverse Confetti.  I stamped it onto a diecut vellum label with Staz On ink.  I added the epoxy bracket sticker to the left so that I could hide my adhesive underneath it.  I used the Teresa Collins Clear Hold Adhesive by Xyron to adhere the vellum to the card.  Lastly, I added just a few pretty silver sequins to finish off the clustered look.

TERESA COLLINS DESIGNS Just Be You Card 2

The embossing you get with the Teresa Collins eBosser folders by Craftwell is so crisp and perfect!  It automatically gives anything you create a sense of elegance.  It is always so fun making cards with them!

Thank you for stopping by my blog today!
post signature

Wednesday, April 30, 2014

Hello My Name Is Tag Cards

Hello There!  I have some fun cards over on the Teresa Collins Designs team blog today featuring some of my favorite products from the Hello My Name Is Collection- I thought I'd share them here, too!  I LOVE the Ephemera Tags that came with each collection this season- I thought it would be fun to do a series of cards using them as my focal points:

TERESA COLLINS DESIGN TEAM Typewriter Hello Card

This first card features the adorable typewriter tag from the Hello My Name Is Ephemera Tags pack.  It is so crisp and white, I knew I had to use a bold red card base.  I added a bit of the striped patterned paper (Lucky) to the bottom of the card base and then added a strip of silver glitter paper diecut into a scallop just over the top edge of it.  
To dress up the tag, I first pulled out my Hello My Name Is Clear Stamps.  I chose the fleur de lis stamp with tan ink and stamped it onto the typing paper.  Next I found some alphabet stamps from my stash and stamped out hello in black ink.  I splattered a little bit of dark gray mist in the same area and let it dry.  Along the bottom of the tag, I added a bit of the gray polka-dot washi from the Hello My Name Is Decorative Tapes and added a mini scallop strip diecut from some silver glitter paper.  I finished off this area of the tag with the limited edition brad from the Hello My Name Is Decorative Brads pack.  To finish off the tag, I added the today sticker from the Hello My Name Is Decorative Stickers sheet using the Teresa Collins Plier Stapler by Xyron.  I added a bit of linen thread to the top and and adhered the tag to the card front.

TERESA COLLINS DESIGN TEAM Typewriter Hello Card 2

This next card was a fun one!  I started with a light gray card base and ran it through my Teresa Collins eBosser using the dotted chevron embossing folder.  Then I pulled out this tag- it had a great kraft top and the bottom had a big white space- I knew I had to fill it up with some fun stamping!

TERESA COLLINS DESIGN TEAM Hello Hello Card

This hello stamp is from the Hello My Name Is Clear Stamp set- I cut it apart from the rest of the stamp so I could use it as a sentiment.  To get this look, you'll need two inks.  I used a bold red and a black ink for my card.  First I stamped the hello with black ink leaving enough room for the image below.  I cleaned the stamp and then inked it up with the red ink.  I stamped it directly below the black image.  I inked up the stamp a second time and then stamped directly above the black image.  I stamped it a second and third time going up the tag without inking the stamp again.  This is called generational stamping.  The ink left over on the stamp creates a lighter image each time you stamp it.  It creates an ombre effect- fun right!!
After I was done stamping, I added a splatter of dark gray mist to the tag.  Next, I sprinkled a few sequins from the Hello My Name Is and Daily Stories collections up the left side of the tag.  Those clear sequins are great- I used my Teresa Collins Clear Hold Adhesive from Xyron to stick them down.  It works perfect for sequins :)  I tied a bit of twine just below the stamping and adhered it to my card.

TERESA COLLINS DESIGN TEAM Hello Hello Card 2

The next card has another cute tag on it- this one has a little label printed on it that I loved!  I knew a little embellishment cluster would look great there!  

TERESA COLLINS DESIGN TEAM Dare To Dream Card

I started with a white card base for this one and added a large panel of the striped patterned paper (Lucky) to the center.  I added faux stitching along the top and bottom edges of the panel.  This beautiful focal point is another stamp from the Hello My Name Is Clear Stamps set.  It's my favorite!!  Such a pretty mix of fonts!  I stamped it into the white space of the tag using a crisp black ink.  Next I grabbed the pretty damask stamp and used it with light gray ink over the label.  I added a splatter of gray mist and embellished the space with a beautiful red gem from the Hello My Name Is Gems pack- the tag needed a big splash of red and this gem delivered!!  I added a small decorative brad to finish off the cluster.
Before I added this tag to my card front, I added the black and white chipboard button from the Hello My Name Is Decorative Buttons pack.  I added a bow of linen thread to the button and then adhered the tag down to my card front.

TERESA COLLINS DESIGN TEAM Dare To Dream Card C

Aren't Ephemera Tags a great product?  I was so excited when I saw that they were included in the new spring collections as well!  You get 20 in each pack and are so versatile- they are great!  I hope I've inspired you to try them out on a card or two! :)

Thanks for joining me today!
post signature

Tuesday, April 22, 2014

A Borrowed and Blue Card

Love is Rare Card 1- Tessa Wise

Hello!  Today I'm sharing a fun card that was recently published in Paper Crafts and Scrapbooking Magazine!  After a long break, I started submitting again around Christmas time and it's so fun to see my work in the magazine!  This one was created for the Something Old, Something New, Something Borrowed, and Something Blue call- isn't that fun?
I loved coming up with bits and pieces from my collection to work with- I pulled out the Memorabilia collection by Teresa Collins Designs to start with and found almost everything within it.  I found the library card and knew it would be my borrowed piece!  For my blue, I cut a heart out of that pretty blue patterned paper.  And for my New, I added some shiny sequins and a bit of the gold scallop border strip.  My something old was the only thing that came from elsewhere- it's an old book page that I punched into a scallop.  I thought it went along with the library theme my card ended up having :)

Love Is Rare Card 2- Tessa Wise

I'm so glad I got to share it with you today!  If you subscribe, check it out on page 36 of the May 2014 issue of Paper Crafts and Scrapbooks Magazine- you'll see a little shout out from Susan Opal in the From the Editors column, too!!
post signature
 
site design by designer blogs