Showing posts with label thank you card. Show all posts

Sunday, January 3, 2016

Grateful For You Card

Hi!

I have been on a Thank You card making kick lately and it's been fun!  I saved one to photograph for my blog before handing them out today :)  Here it is:


So, I used goodies from my stash for this one!  Everything is older except for the new embossing folder- I love these wide stripes!  It's from Heidi Swapp.  The label die is also newer- from the fall anyhow- and by Lawn Fawn.  I used the pretty Blossoming Buds stamp set from Paper Smooches to and stamped the flowers onto a tag cut out of watercolor paper.  I painted them in with my ink pads.  The papers are from an older October Afternoon 8x8 pad called Woodland Park- I still love these designs!


I hope you had a great holiday season!  My girls are excited to be getting back to school tomorrow.  I start next week- after CHA!!  I'll be working with Nina and a few other DT girls in the Waffle Flower Booth!  If you're heading there be sure to stop by and say hi! :)

Thanks for stopping by!
post signature

Monday, May 18, 2015

Little Miss Mia Thank You Cards for SRM

Hello!  I'm sharing a couple of cards on the SRM Sticker blog today and thought I'd share here too!  I created two cards using the adorable Little Miss Mia stamp set.  I personalized each one to look like my daughters.  I thought they would make cute teacher thank yous at the end of the year!

This first one features Mia with red hair, just like my little girl Natalie:


She was colored with Copic markers and then cut out.  The papers are from the Star Student collection by Bella Blvd.  The large Thanks sentiment from the We've Got Your Sticker- Thanks sheet is perfect on this one!  I love how it looks at the bottom of the panel.  I also added a bit of Midnight Blue Baker's Twine as a little accent.


The second card features Mia with brown hair and freckles, just like my daughter Zoey:


I stamped her onto a white cardstock panel and colored her with Copic markers.  I used foam adhesive tape to adhere it to the center of my card front.  The papers on this one are also from Bella Blvd's Star Student collection.  The sentiment is from the We've Got Your Sticker- Thanks sheet.


I have had so much fun playing with the Little Miss Mia stamp set!  I love how you can personalize it any way you want :)

Thanks for joining me today! 


post signature

Thursday, May 7, 2015

Thank You Card for Waffle Flower Crafts

Hello!

I've been stocking up on Thank You cards lately- I never seem to have enough!  I paired the 100% Love Stamp Set with the Doily Circle Die for this one:


This one ended up bright and collagy, didn't it?  I started with a white card base and splattered it with gray mist.  Once it was dry I added a strip of striped pink patterned paper to the top on a slight diagonal.  I diecut the Doily Circle Die out of yellow cardstock and cut it in half.  I added it just below the pink strip.  Next, I stamped the Thank You with #13 Malibu from the Summer Blend Inkpad and cut it out.  I added it to the left side using dimensional foam tape to make it pop.


The embellishments are from Freckled Fawn and the sticker stitches are by SRM Stickers.  The bright colors are so fun on this one, aren't they?  I love how it all came together :)

Thanks for stopping by today!
post signature

Monday, December 29, 2014

Frozen Friends Thank You Card

Hi!  I have a cute little card to share with you today using the adorable Flaky Friends set by Newton's Nook Designs:


With Christmas just past, I was in need of a few thank you cards to send out!  I created a simple layout that I could easily make multiples of.  I also chose an image that was easy to color- for me, that's snowmen!  They only need a few colors :)

I punched the circles first and stamped the little snow dog.  I colored him in and then used the thanks banner image from winged wishes across the top.  I colored it in too!  I chose a couple of winter patterned papers for my background and added a strip of glitter cardstock over the seam. I added a bit of twine and then placed my circle using foam adhesive for dimension.


I ended up creating a bunch of these and they were so quick!

So- I was trying to go all business as usual for this post but now that I'm at the end it's a little harder... this is my last post as part of Newton's Nook Designs Design Team :(  I have enjoyed being on this team so much- I love the people and the adorable designs!  I am sad I can't continue on with them but I know I will have so much on my plate in 2015- it is just my time to say goodbye.  Luckily we can still be friends! :)  Thanks so much Jen!!
post signature

Tuesday, December 16, 2014

Thank My Lucky Stars for You Card

Good morning!  Hope your day is off to a good start! :)  I'm sharing a card I made for my husband today using the Starry Night Stamp Set by Waffle Flower Crafts:


This stamp set is one of my favorites!  There are so many options and it's fun to build space scenes!  I started with a black cardstock panel and stamped some stars and dots with white ink.  Next, I splattered it with some shimmer spray.  The sentiment was added to the bottom corner using Versamark and embossing it with white powder.  I added a few rhinestones around it, too!

I knew I wanted to create an inlaid diecut look with the moon.  I stamped the outline onto gray paper and cut it out.  I added the craters with gray ink and the same shimmer spray as before.  I pulled out the Tiny Heart Die  and placed it in the lower, right hand side of the moon and ran it through my diecut machine.  I then placed my moon onto the black panel using foam adhesive to pop up the moon and the heart for dimension.


Once the focal panel was finished, I made a card out of light aqua cardstock.  I added a bit of patterned paper from Teresa Collins Studio Gold 6x6 pad to the bottom of the card.  I added a strip of silver foil paper over the seam, at an angle across the card.  I placed a panel of vellum on the card next, at an angle and then layered my black panel over the top, also at a slight angle.  I love the layers!

I'm so glad I pulled out the Starry Night Stamp Set to play with- it really is a fun one! :)  Hope you have a great day!
post signature

Monday, June 23, 2014

Some Fun News and a Card!

Good morning!  Today is a great day!  Sunny skies, happy kids, and fun news to share!  I am joining a new fabulous design team- a company that I've been a fan of for a long time- SRM Stickers!!  I am so excited to be an ambassador of such a great brand!  I feel like every time they come up with something new it was made just for me!  I really couldn't be happier!


I've already started designing some projects for them!  I thought I'd share one today with my fun announcement. :)  Here is a card I made using some of my favorite SRM products:


My card features an awesome sentiment sticker, some honeydew baker's twine, and an adorable mini clothespin!  They go great with this fun typewriter stamp, don't they?  The stamp is from a new company called Pink Bow Ties.  Meka, the owner, is a local lady and we share a love of typewriters!  This one is big and bold and I love it!  The inks and patterned paper are from Stampin' Up! and the border sticker is from Bella Blvd.


I am so excited to be part of the SRM team this year!  I can't wait to see what they have in store for us!
post signature

Tuesday, July 16, 2013

Newton's Nook Designs Launch Party: Just Say Cheese

Welcome to day 2 of Newton's Nook Designs Launch Party!!

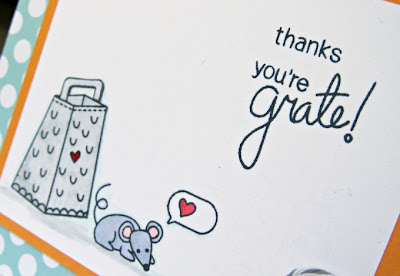
Today's release is the Just Say Cheese set!  It's another fun one and features the cutest images and sentiments all related to cheese!  This one seriously makes me laugh :) Here is a card I made:


I stamped the little grater, the mouse, and the sentiments onto a panel of white cardstock.  I colored it using water based markers and a few of my favorite copics for shadowing.


The sentiments in this set coordinate so well together!  I used two separate ones here- there are so many options with them!
After I was finished coloring, I matted my stamped panel onto orange cardstock leaving room for the twine on the right.  I matted this panel onto my pretty polka-dot card front.

Just like yesterday, Newton's Nook Designs is giving away this fun stamp set!  Here are the details:

Would you like to win Just Say Cheese? This set will be given away to Two lucky winners!

Here's how to win:

1. Comment on Newton's Nook Design blog: http://www.newtonsnookblog.com. One Winner will be randomly chosen from the comments on the launch party post.

2. Comment on the Design Team Member and Guest blogs (see list below)! One winner will be chosen at random from the collective blogs in the Launch Party. Make sure to check out each of their blogs and comment for your chance to win. You will not know which blog has been chosen so the more you comment on the better your chances are of winning! You have until Thursday, July 18th at 9pm Central Standard Time to comment  -- winners will be announced on the blog post on Friday, July 19th.

But wait… there's more. We will also be giving away a gift card on Facebook this week to celebrate our launch - so be sure to pop over there to like our page and enter to win! https://www.facebook.com/newtonsnook

Make sure you check out all the blogs participating in the Launch Party below to enter:


Chari Moss

All nine designers have made the cutest cards so make sure to check them all out!  Remember, the more comments you leave, the more chances you have to win!!

-tessa

Wednesday, July 10, 2013

Thanks So Much Card

Hi there!  I'm back today to share a card that was published in this month's CARDS Magazine!  It was a favorite of mine back in February when I made it! :)  I was on a mission to create a Thank You that was appropriate for a man and came up with this:


All supplies are by Stampin' Up! and each of them could be considered a favorite, too!  I really like how all the elements work together and aren't too fussy, either.  I used the Oh, Hello stamp set along with the First Edition and Comfort Cafe DSP packs.  They look great with those fun wooden buttons, don't they?  I think it stayed pretty masculine, too!

Well, I hope you have a great day!

-tessa

Tuesday, June 18, 2013

Teacher Cards

Hi There!  Well it's Tuesday!  It's also the last day of school for us this year!  It's amazing how fast the school year went--  I can't believe that I'll have 1st and 3rd graders in a few months!  Today I wanted to share a couple of the cards I created for my girls' teachers this year.  I am so thankful for the staff at their school!  We have had a great year and I've seen my girls grow so much!  I know a lot of it has to do with school and especially their teachers!

For these cards, I used Lawn Fawn's A Good Apple set.  I love how the mini chalkboards turned out!


This one is for Zoey's teacher.  He is so great!  For this, I used Simple Stories 24/7 line.  I kept it simple to let the sentiment shine!


Here is Natalie's teacher's card:


I used Pebbles Inc. Lakeside collection.  Again, I kept it simple!


I had lots of fun stamping these little chalkboards!  Of course, both girls said "Mom, you know we have white boards at school, don't you?"  lol!  Times have changed!  Maybe I'll try a white board next time! Wouldn't that be cute with neon embossing powder?

Well, hope you are enjoying your day!  I'm going to get these kids to school and then run my errons!  Happy last day of school! :)

-tessa

Tuesday, June 4, 2013

Some Teresa Collins Designs Cards

Good Morning!

I am sharing some cards over at the Teresa Collins Designs team blog today! Since I had a little extra time before dinner, I thought I'd share them here, too! :) I had a card making marathon last week and got so many done! Here are a few showcasing the He Said She Said line:


I started this card by cutting lengths of the garland and adhering them to the left side of the card. Next, I stamped my sentiment onto vellum with Versamark ink and heat embossed it using white embossing powder. I adhered it to the card front using the green washi tape and to add a little stability to the vellum, I added the scallop and red patterned strip to the edges. Lastly, I embellished it with the pretty red enamel dots.


I am such a fan of white heat embossing- especially on vellum! Just be careful when you're heating it up- it melts so much faster then on regular cardstock!

My next card is a clean and simple design. I used the banners from the She Said die cuts sheet to draw your eye straight to the happy sentiment:


To create this card, you'll need a white card base. Cut a white panel of cardstock the same size as your card front (5.5x4.25") and emboss it. Cut a bit off the top digagonally and adhere it to your card front. Add your banners next, overlapping them just a little. Stamp your sentiment on to gray cardstock with Versamark ink and heat emboss it using white powder. Add it to your card over the seam between the embossed panel and smooth card front using dimensional foam dots. Last, add a length of twine, finishing in a bow directly above the sentiment. Let the tails hang underneath the sentiment strip.


This one may be simple but I love how it turned out! The twine and embossing add texture while the banners and diagonal lines add interest.

Card number three has a modern shabby chic look to it. I've added a little garland from the Memories line on this one:


For this card, I started by stamping the hearts from the She Said stamp set onto the kraft background using Versamark. Next, I splattered some shimmer spray over the top of them. When it was dry, I adhered a doily folded in half to the front. I stamped the sentiment in brown ink and added two banners from the He Said She Said- She Said die-cut sheet. Next, I added the garland, adhering it only on the two aqua pieces so that it hangs loosely on the card. I finished it off with the linen thread, wrapping it around the card front twice and finishing in a bow.


The best part of this card is the movement of the garland- it hangs over the edge and is such a fun element!

I have one more for you! For this one I used the He Said She Said- She Said die cut flowers as my focal point:


To recreate this card, start with a textured white card base. Cut a panel of the black print from the Summer Stories 6x6 designer pad and matt it with yellow cardstock. Adhere it to the center of your card front. Create your tag out of the blue flower journaling card found on the He Said She Said- She Said die-cut sheet. To make it into a tag, just cut off the top corners. Add a strip of patterned paper over the words and adhere the tag onto the card front. Choose a flower from the He Said She Said-She Said die-cut flowers and adhere it to your card using dimensional foam adhesive. Punch a circle out of a coordinating patterned paper and add a brad to it before adhering it to the center of the flower using another dimensional foam dot. Finish it off by embellishing with green epoxy dots, a pretty coral button, and your sentiment.


I love how the tag and flowers look over the black patterned paper. They really pop!

I enjoyed making these cards so much! I really love the He Said She Said line- the colors work so well together!  And, now that I've been looking at them all again, I am wishing I had time to have another card-making marathon!  :)  There's always tomorrow!

Well, thanks for stopping by today!

Supplies Used:
Teresa Collins Designs:
He Said She Said- She Said 6x6 Designer Pad, He Said She Said- He Said 6x6 Designer Pad, Summer Stories 6x6 Designer Pad, He Said She Said- She Said Decorative Brads, He Said She Said- She Said Epoxy Dots, He Said She Said- She Said Die Cut Accessories, He Said She Said- She Said Decorative Tape, He Said She Said- She Said Clear Stamp Set,  He Said She Said- She Said Decorative Buttons, He Said She Said- She Said Die Cut Flowers, He Said She Said- She Said Garland, Memories Garland
Other:
Sentiment stamps, ink, cardstock, doilies, scallop punch, embossing folder, linen thread by Stampin' Up!; Mists by Studio Calico; Baker's twine by The Twinery; sticker sentiment by SRM Stickers; sentiment stamps by Lawn Fawn


Thursday, April 4, 2013

Little Birdie Projects for SRM Stickers

Good Morning!

Today I'm excited to share that I'm guest designing for SRM Stickers!  I used some of my favorite products from their current line to create a trio of fun, bird themed projects!  Here is a little peek:


I created three projects for them using their amazing stickers, glassine envelopes, and tubes.  My favorites are the Stickers By the Dozen Sheets because so many come on one sheet!   The 'Thank You' seen above is a great example- it is the perfect size and I love the fonts!  I am also in love with their glassine envelopes and clear pillow boxes.  They add a special touch when giving out goodies to my friends and family!

Please pop on over to the SRM Stickers blog to check out my projects!  Susan is also giving away some of the goodies she sent me to use so be sure to leave a comment there for your chance to win!!

It has been so much fun creating for SRM Stickers and I am so thankful for the opportunity!  Thanks again Susan! :)

-tessa


Thursday, March 14, 2013

Kind Memories Card

Hi there!

I am just sitting down after cleaning my house... not my favorite way to spend the morning but it has to be done!  I like to get the main cleaning done on Thursdays so that the weekend can be spent having fun and messing up the house again! :)

I thought I'd pop on and share a pretty card I made using the Memories line by Teresa Collins:


For this card, I used all of my current favorite things!  The embossing folder is new from Stampin' Up!, the papers, flower stamp, and epoxy dots from the Memories line, and twine from the Twinery!  The color scheme is also a favorite at the moment- I am loving that light aqua and yellow with the bold coral!


I added a little glitter to the center of the flower that you can't see in the photo- it adds a little touch of sparkle to it though!

Sharing this card makes me remember- I think I mentioned that I was taking a class with Teresa Collins a few weeks ago at the retreat I went to.  I can say, the class was the most enjoyable class I have ever taken!  We made mini books and I was able to finish it with ease and can't wait to add my pictures!  Teresa is a such a nice person and even though every scrapbooker around knows her name, she is easy to talk to and so kind!  She walked around and talked to lots of people at the retreat after her classes were finished and took the time to let them show her what they were working on.  She took pictures and signed autographs- even for me! Hee!  Yes, I had to go fan-girl and get a picture! :)


If you ever have a chance to take a class with Teresa, don't hesitate!  It was fun and so enjoyable and I am hoping she'll come out for our next retreat in November!

Writing this story makes me want to run downstairs to scrapbook!  Maybe I can work on my 'meeting Teresa Collins' page! :)

Hope you have a great day and thanks for stopping by my blog!

-tessa

Wednesday, January 23, 2013

Thankful Owl Card

Hello!
I made a card today for another new-to-me challenge, the Lawnscaping Challenge!  Lawn Fawn stamps are one of my favorite companies and one that I can find locally which makes them even better!  I love supporting the few smaller stores in my area!

Anyways, here is the card I made for their winter wonderland challenge:


This little owl is such a fun stamp!  I colored him using Copic markers and then added some black ink around the outside edges. 


The paper pieced scarf and background panel are from the Sn@p line by Echo Park.  These 6x4 project life fillers are perfect for card fronts, aren't they?  

This week has been going by fast!  I guess they usually do after a three day weekend.  I am looking forward to a crop with my scrappy friends on Friday so I'm OK with that!  

Well, I hope you are having a good evening!
-tessa

**Edited to add**
Thank you for all your comments!  I am so excited to be one of the top mow it alls this time around!!


Wednesday, January 16, 2013

A Cup of Thanks Card

Today's card is inspired by this week's SPARKS sketch challenge!  I used my newest set of Paper Smooches stamps, Cyber Cafe, to make this card:


Goodies:
Stamps: Cyber Cafe by Paper Smooches
Ink: Versafine Onyx Black
Paper: Tempting Turquoise, Whisper White, Daffodil Delight cardstock by Stampin' Up!; patterned papers from Sn@p line by Simple Stories
Accessories: Copic markers, red baker's twine by We R Memory Keepers

I stamped the cup onto yellow cardstock and cut it out.  I pieced it onto my white panel and added a sentiment before adding it to my card front with dimensional adhesive.  I punched a small hole into the card to add the twine bow.  To finish off my card, I added a little coloring with my Copic markers to create some shadows.  

I'm so glad I had time to play along with the SPARKS challenge this week! It's a fun one and if you have time, make sure you check it out!


I'm off to finish a scrapbook layout I've been working on for the last two days... I was having a hard time coming up with a title but I'm just going to commit and finish it up today. 

Thanks for stopping by my blog today!

-tessa

Friday, September 14, 2012

Fishies Thank You Card

Hello there!

I thought I'd take a baby step today and post a card.  It has been so hard returning to a school year schedule for me, especially since both my girls are in school full time this year.  I have all day to do the things I need to do but most of the time, I don't want to do them... I don't much like being a stay-at-home mom when there is no one else here with me!  I'm thinking about getting a job... anyone need a card sample maker?  Hee!

Anyways, here is a card I made recently using some fun papers from Little Yellow Bicycle's summer line:


Goodies:

Paper: Crumb Cake and Poppy Parade cardstock by Stampin' Up! Splash Collection patterned papers by Little Yellow Bicycle
Accessories: Basic Rhinestones by Stampin' Up!;  Tiny Attacher by Ranger Ink; Splash Collection Tear Out Ticket & Journaling Card Book; Hemp  Twine by Stampin' Up!; Aqua Mini Market letter stickers by October Afternoon

I know parts of this design were influenced by a card I saw in Cards Magazine but now that I need to find it, I can't.  I loved the tag element and the staples.  For my tag, I cut the fish from the patterned paper and popped them using a dimensional.  I added the rhinestones for bubbles- you gotta have a little bling, right?

So, hopefully this baby step will help me getting back into a routine of sorts... I love sharing what I make!  Thanks for stopping by today!

-tessa

Wednesday, April 11, 2012

Watercolored Butterfly Card

Hello!

Today I have another card from my upcoming class at Scrapdoodles! I'll be teaching on April 21st and if you are in the NoVa area, I'd love to see you there! Please call the store at (540) 548-3788 to sign up. I can't wait to show you all this watercoloring technique using Tim Holtz's new Distress Markers. Here is my card:


And a closeup:


Nice and bright, isn't it? This class is sure to be a fun one!

I'm catching up with all sorts of things today so I'm going to keep my post short and sweet as to not waste too much time on the computer- hope you have a great day and thanks for stopping by!

-tessa
 
site design by designer blogs