Monday, December 30, 2013

Happy Holidays!

I've been taking a little holiday break from the blog while my girls are home on winter break.  It's been great and we've been having such a fun time!  Today we are going to spruce up their bedrooms a little bit- it's something that needs to be done and I'm bribing them with new posters for their wall!  lol!

I thought I'd pop on today and share the winner of my giveaway- Marcy, you won both of my favorite Newton's Nook Designs sets!!  Can't wait to see what you make with them!

I also thought I'd share a couple pictures- this one is what I chose for the Christmas cards this year... that I didn't send out... I gave out like 3.  Sorry!

Family Photo 2013

And here is a picture of the girls and their cousins we spent Christmas with:

Kids at Christmas

These kids are such sweeties!  Love that we were able to spend the holidays together!!

I'll be back tomorrow with a few cards!  Hope you enjoyed your holidays!!

-tessa

Friday, December 20, 2013

Family Forever Layout

Happy Friday!  It's been a great day here- finished up my Christmas shopping and got everything wrapped and under the tree!  The girls got home from school all sugared up and ready for vacation.  Luckily, we are having a warm streak- it was almost 70 out today!  I sent them outside to play! :)

Before we settle in for Christmas break, I thought I'd pop on and share my latest layout for Inspired Blueprints.  Number 115 went live today!  Here is my take on the sketch:

Family Forever Layout

This was a great sketch!  I was able to use three 4x6 photos.  I stuck to the sketch, adding a few more tags and embellishments.  I ended up not journaling much- these were just silly selfies from our last hike before winter.  We do this all the time but it was fun to scrap these cause they were pretty funny!

Family Forever Layout 2

The papers and embellishment stickers are from the Head Over Heels collection by Echo Park.  I also used a few stickers from My Mind's Eye's Cupids Arrow collection.  The colors in both lines are pretty close so they worked well together!

The Inspired Blueprint design team did a great job with this sketch!  Pop over to the IB blog to see what they did and to see the original sketch.

Well, hope you enjoy the rest of your day!

-tessa

Thursday, December 19, 2013

Snow One Like You Card and Giveaway!

Good Morning!  I have a cute card for you today using one of my favorite Newton's Nook Designs sets- Frozen Friends:

Lovely Snowmen Card 1

I paired these adorable snowmen (colored with my Prismacolor pencils) with an older Crate Paper collection I had in my stash.  I also added a panel of vellum stamped with gold hearts and snowflakes:

Lovely Snowmen Card 2

These little guys make me so happy! 

As a thank you to everyone who stops by my blog, I wanted to do a giveaway!  I chose two of my favorite sets by Newton's Nook Designs- Frozen Friends, and Wagon of Wishes:


If you'd like a chance to win these sets, please leave a comment on this post.  You'll have until 11:59pm EST Sunday, December 22nd to comment.  I'll choose a winner on Monday, December 23rd.  Good luck! :)

Thanks so much for stopping by today!

-tessa

Wednesday, December 18, 2013

Newton's Nook Design Team Spring 2014

Good Morning!  Today Newtons Nook Designs announced their spring design team and I'm so happy to be a part of it!!


There are such inspiring ladies joining the team this season and I can't wait to get to know them and see their awesome work!  It's going to be so fun!! :)

We are all sharing cards today and I created one, too!  This one features those cute dinosaurs from the Prehistoric Pals set:

Dinosaur Facts Card

I think this whole team is dyno-mite!!  :)  Congrats to everyone and I can't wait to see what 2014 brings for Newton's Nook Designs!

-tessa

Tuesday, December 17, 2013

Santa's List Cards and Tags

Hello!  I've got a post up on the Teresa Collins Designs blog today- I thought I'd share here, too!

Only a few more days until Christmas and I've been busy wrapping up gifts.  I love to make special tags and cards for my packages- it adds a special touch to each gift I give.  Here are a few that I made this year:

Gift Card Tag

The first one is a gift card holder tag.  I cut an extra long piece of cardstock and folded one end up to create a pocket.  It holds the cute Starbucks gift card perfectly!  This one is embellished with the cute postal label stamp, some of the fun border strips, a chipboard button, and a few epoxy dots- all from the Santa's List collection.

25 Tag

My next tag was quick- I started with the doily journaling card and embellished the bottom with a glittery red border strip.  Next, I stamped the calendar above the border strip with brown ink.  I added a punch out banner flag next and then stamped and punched the sentiment onto the snowflake patterned paper.  I added the decorative brad next and adhered it to my tag with a foam dot.  Lastly, I added a few sequins for sparkle.

I have a couple cards to share, too!  Here is my first one:

Santa Card 2

I started this one with a kraft card base.  I started by stamping the snowflakes up one side of the card with red ink.  Next, I added the journaling card with the snowflake punched out.  I added some punch outs and banner flags to the left corner of the journaling card next and then added a few sequins as accent.

My last one is a fun one using more of those pretty sequins:

Wonderful Christmas Card

I loved this journaling card and knew it would be a fun sentiment on a card!  I created a red card base for it and then added a strip of kraft cardstock to the center.  I added my sentiment card next and wrapped it with a bit of silver cording, finishing it with a bow.  I started adding the sequins next, starting close to the sentiment card.  I added fewer and fewer as I went up.  Lastly I went back and added the glitter bits- they are the centers from the silver sequins that I found in the baggy- don't they look pretty mixed in?  :)

I add my cards to the front of my packages using a card hanger die by Soapbox Creations- who needs an envelope with this:

Present Card

Now my gifts have a little extra wow and I can check the present wrapping off my list!  Hope you are all enjoying the season and thanks for joining me today!

-tessa

Supplies Used:
Teresa Collins Designs: Santa's List 12x12 papers,  Santa's List Sequins, Santa's List Chipboard Buttons, Santa's List Epoxy Dots, Santa's List Border Strips, Santa's List Die-cut Sheet, Santa's List Decorative Brads, Santa's List clear stamp set

Other: Cardstock by Stampin' Up!; Twine by The Twinery; Snowflake punch by Stampin' Up!; Ribbon by Stampin' Up!; Card Hanger Die by Soapbox Creations

Thursday, December 12, 2013

A Sketchy Birthday Card

Today is my mom's birthday!  Happy Birthday Mom!!  I made her a card of course and thought I'd share it here, too!

Chalkboard Birthday 1

I paired Stampin' Up's Sketched Birthday set and Chalk Talk Die-cuts with Pink Paislee's Hey Kid mini pad.  The colors are so fun in this collection!

I diecut the bread tag out of some chalkboard patterned paper and stamped the cake with Versamark ink.  I embossed it using white powder and then added a doodle around the outside edge of the tag as well as a splattering of white mist.  The sentiment is also heat embossed with white on red cardstock and cut out.

Chalkboard Birthday 2

I wish I was spending the day with my mom instead of just sending her a card and gift!  Sometimes it's so hard living far away from family and friends.  Luckily I've made some pretty great friends here in Virginia, too and that makes it a little better...

Anyways, hope you are having a great day and thanks for stopping by!

-tessa


Wednesday, December 11, 2013

Artsy New Goodies From Stampin' Up!

Every now and then I get asked to make some samples for my Stampin' Up! demonstrator- and of course I always say yes!  I love playing with new goodies!  She popped by with some of the new products from the upcoming Celebrate the Everyday Catalog and I got right to work.  Here are the cards I made:

Happy Flowers Card 1

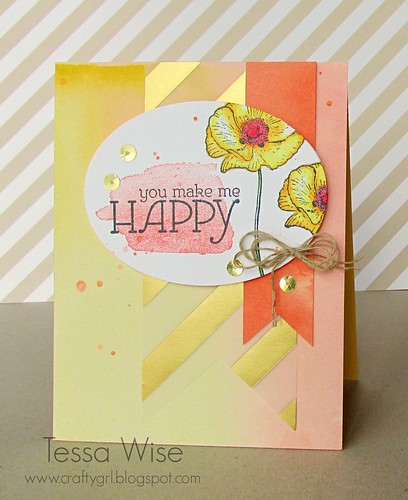
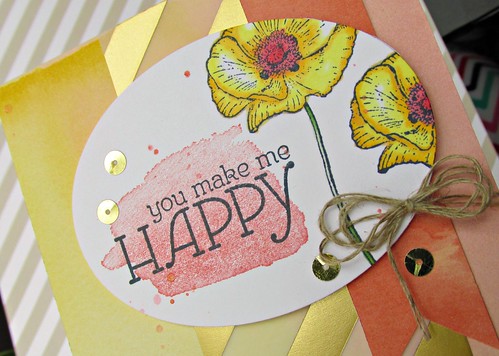
This first one features the beautiful Happy Watercolor stamp set along with the Fancy Foil Designer Vellum, and Watercolor Wonder DSP.  They are all gorgeous- seriously!  The flowers, paint splotch, and sentiment have been stamped on Whisper White cardstock that I die-cut into an oval.  The flowers were watercolored with residual inks.  I've added a little splatter with a Cameo Coral reinker mixed with water and a few gold sequins, also new in the catalog

Happy Flowers Card 2

Aren't the touches of gold pretty?  I wish I had the gold baker's twine to do my bow with, too!

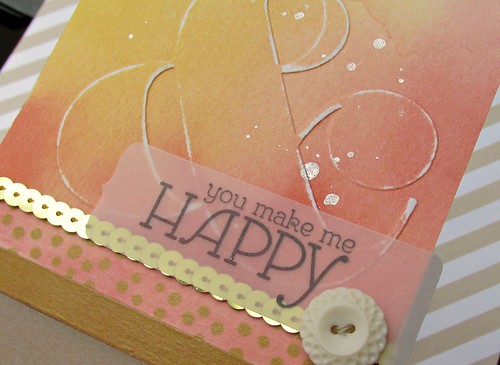
The second showcases the new Ampersand embossing folder along with the Watercolor Wonder washi tape, Gold Sequin Trim, and Watercolor Wonder DSP.  I can't get enough of that DSP!!

Ampersand Card 1

I love this embossing folder!  The large ampersand is so cool!  I've embossed my card front and then sanded over it a little so it would stand out a bit more on the dsp.  Next, I added two of the new gold washi tapes to the bottom of the card along with a big of the pretty gold sequin trim.  I stamped my sentiment (from the Happy Watercolor set) onto vellum and die-cut it using one of the Chalk Talk dies.  Lastly, I embellished it with a pretty button and a splatter of shimmer spray.

Ampersand Card 2

I loved the look of this paper in the book and it doesn't disappoint!  The full watercolor sheets are my favorite!

One more card- this one is clean and simple:

Cantaloupe Thank You Card 1

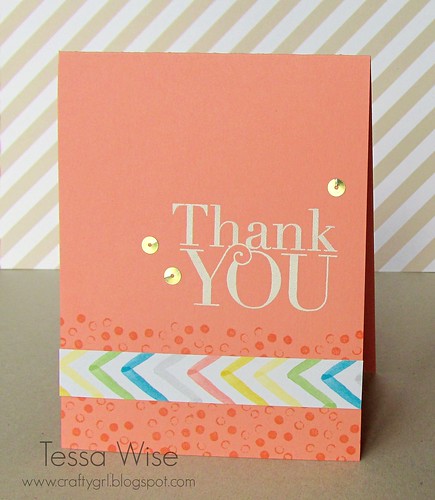
I started with a card base of Crisp Cantaloupe.  I then stamped the watercolor polka-dots (from the Happy Watercolor set) along the bottom with matching ink.  I added just a strip of the multicolored chevron print.  Next, I stamped and embossed the sentiment (from the Another Thank You set) and then I added a few sequins for accent.

Cantaloupe Thank You Card 2

The colors in the Watercolor Wonder suite were so fresh and fun to play with!  I really enjoyed the new goodies and I can't wait until January to order!  I am loving so much out of the mini!!

Well, hope you are having a great day!

-tessa


Tuesday, December 10, 2013

Yeti Gift Card Holder

Hi there!  How's your morning going?  We have a second snow day today and we actually have snow!  The girls couldn't be any happier!  The first snow is always fun when you're little and this one has been pretty easy on my too since the roads are just fine to drive on!  Hee!

Since we are just hanging out today, I thought I'd share a fun card using the cute Yeti, Set, Go set by Lawn Fawn today!  It has a glassine envelope on the front to hold a gift card:

Yeti Gift Card

The yeti was stamped on Soft Sky cardstock and then colored with Copic markers.  I used a Signo white gel pen to color his hands and feet white.  I stamped my sentiment onto the glassine envelope using Staz-On ink so it wouldn't smear and then added some washi tape and sequin snowflakes!  This one was pretty quick and really fun!  I even used it as a class sample at the Scrapdoodles retreat this year!

Well, better keep this short- I have some crafting to do today!  Hee!  Hope you have a great day and thanks for stopping by!

-tessa

Monday, December 9, 2013

Coffee and Friends Warm the Heart Card

Hi!  It's Monday but it doesn't feel like it- my girls are home from school because of the icy weather we woke up to.  Snow days are always fun and we are definitely enjoying it!

Today I wanted to share a card I made over the weekend.  I pulled out my newest goodies from Reverse Confetti to play along with their December Sketch For You To Try.  Here's my card:

Coffee Card 1

Great sketch, right?  I really enjoyed it!  I also enjoyed playing with the adorable Be a Barista set- being a coffee lover, it's right up my alley!

I paper pieced my coffee cup using some fun prints from the Pink Paislee Hey Kid mini pad.  I added some shadowing with my Copic markers and then added it to the center of my die-cut tag.  I added the sentiment last, die-cutting a banner to put it on.

Coffee Card 2

I'm so glad I found some time to play along with their challenge!  Pop over to the Reverse Confetti blog to see the original sketch.

Thanks for stopping by today!

-tessa

Friday, December 6, 2013

Deck the Halls with Inky Paws Blog Hop!


Hi and welcome to the Deck the Halls with Inky Paws Blog Hop!  I'm hopping along with Newton's Nook Designs today- did you just come from Jennifer Ingle's blog?  If not, be sure to pop over and see what she made!  We are all sharing fun holiday projects today!  Here is mine:

Crabby Christmas Card

I chose to work with the silly SEA-son's Greetings set.  This one just makes me smile!  I imagine that Santa sent his crabby friend a boat load of presents- he had no trouble picking one to open first! :)  I wonder what was on his list?  Hee!

Crabby Christmas 2

I built my scene using cardstock and added the colored crab and boat with pop dots.  The crab and boat are colored with Copic markers.  I added the sentiment banners next- the 'wishing you' comes from the Holiday Wishes set. To finish it off, I added a few sequins- you gotta have a little sparkle on holiday cards!

Would you like to win a $10 coupon for Newton's Nook Designs online shop?We will be choosing Two lucky winners
Here's how to win: 
Comment on the Design Team Member and Guest blogs (see list below)! One winner will be chosen at random from the collective blogs in the blog hop. Make sure to check out each of their blogs and comment for your chance to win. You will not know which blog has been chosen so the more you comment on the better your chances are of winning! You have until Sunday, December 8th at 9 pm CST to comment  -- winners will be announced on the blog post on Monday, December 9th.
Make sure you check out all the blogs below to enter:

Deck the Halls with Inky Paws Blog Hop


Also, Newton's Nook Designs will be doing a free shipping promotion all weekend to celebrate the blog hop (until Monday Dec. 9 at Midnight CST).  Just use the code INKYHOP13 while checking out!

Well, have fun hopping today!  Your next stop is Jocelyn Olson- she always makes the cutest things!

Thanks for stopping by!

-tessa

Thursday, December 5, 2013

Inspired Blueprints 113- A Christmas Layout

Hi!

Inspired Blueprints sketch #113 is up!  As always, I had so much fun with the sketch!  I chose an older photo of my youngest during her first Christmas- boy does it bring back some good memories!  Here is my layout:

Natalie Christmas Layout 2

I used Teresa Collins Designs Santa's List collection for this one.  I was saving these papers for a special project and I'm so glad I brought them out for this one!  The photo is one of my favorites- we have it printed and hanging in our living room at Christmastime but I've never scrapped it!

Nats First Christmas Layout 3

I have to admit, I went a little heavy on the patterned paper here!  I love all the prints though and although it looks busy here, it is better in real life.  :)

Be sure to pop over to the Inspired Blueprints blog to see the original sketch and to see what the rest of the team members created- they are such a talented bunch!

Thanks for popping by today!

-tessa

Papered Ornaments

Hello!

How's your week going?  We've been busy here- we decorated our tree and put our lights up outside.  It's so fun getting all the Christmas stuff out- I only wish I had more! :)  I love decorating for the holidays.  Every year I make a few ornaments for our tree I thought I'd share a few that I've made this year.  I've been using a paper-mache' technique I learned in a Stephanie Ackerman class I took last year- it is so much fun and really easy to do.  Here are my ornaments:

Merry and Bright
Merry and Bright Ornament

Mr. Foxy
Can you guess what song I had stuck in my head?  Hee!
Fox Ornament

Cocoa
I added a little glitter to the inside of the cup.
Cocoa Ornament

Snowflake
This one is actually more aqua then green... 
Snowflake Ornament

The base is a glass ornament.  Then I paper-mached torn book print over the top.  Once that was done, I tore, cut, or punched different shapes from inked book print and added them.  Next is the shadowing and then I added some embellishments.

It's such a joy to see fun handmade ornaments on my tree!  The girls have been busy making some, too but I'll share them another day...

Hope you have a great afternoon!

-tessa
 
site design by designer blogs