Thursday, December 29, 2011

Tissue Paper Flowers

Hello!

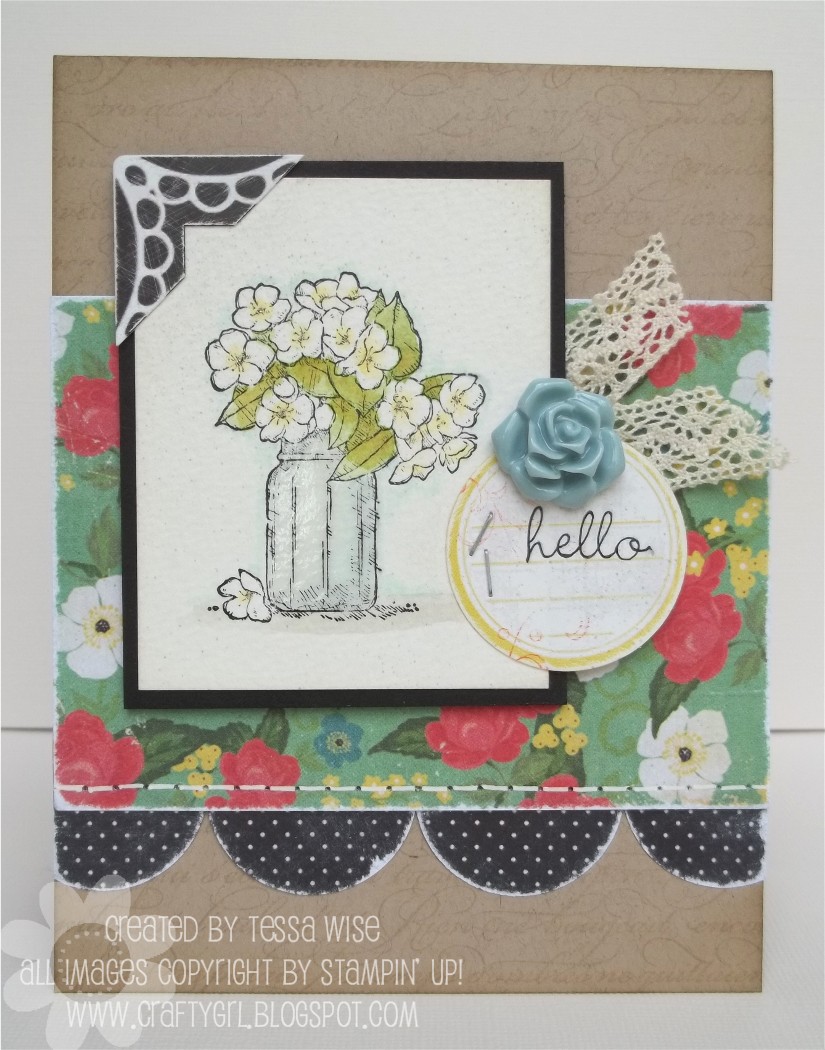
I thought I'd share another card I made with goodies from the upcoming Stampin' Up! Occasions mini and Sale-a-bration catalog with you today! There are some really cute offerings and this set is sure to get lots of use! It's called Fresh Vintage and this one is the Sale-a-bration catty:


Goodies:
All products by Stampin' Up!

Stamps: Fresh Vintage, Good Grid
Ink: Lucky Limeade, Sahara Sand, Rich Razzleberry, Basic Black
Paper: Sahara Sand, Twitterpated DSP, white tissue paper
Accessories: Lucky Limeade ruffled ribbon, Antique brads, Scallop Circle punch

Stamped a few of the images from the Vintage Fresh set over the grid background. I love the layered look it created and how it lets the hand made tissue flower stand out. Here is a closer look at the flower:


I found it easiest to punch my scallops first. The tissue paper is thin so you need to do many layers at the same time to get them to punch. I used about 8 scallops for one flower. Once I had them all punched out, I stamped them with black ink and and the large floral image from the Fresh Vintage set. I let them dry for a minute and then stacked them up and added a brad to the center. Then you just fluff your tissue around the brad to create the full ruffled look.

You can see I really enjoyed playing with these goodies! My demo friend Kiesha just got another order of Occasions/ Sale-a-bration stuff so hopefully she'll let me play again soon!

Thanks for stopping by today!

-tessa

Wednesday, December 28, 2011

Peek-a-boo Butterflies Card

Hello!

Hope your day is starting off well! We are still in vacation mode here- I love having the girls home from school and we've been pretty lazy so far this week! I don't have much planned except for some play time with thier friends. It's been so nice and very relaxing!

I took some time to craft yesterday and was inspired by Lifestyle Crafts I Made This contest. I would LOVE to win that grand prize- could you imagine?? How fun!

I used my Tag It Kit die set to create this card with pretty peek-a-boo butterflies:


Goodies:

Stamps: A Note of Thanks set by Stampin' Up!
Dies: Tag It Kit set by Lifestyle Crafts
Paper: cardstock by Bazzill and Stampin' Up!
Ink: Black Versafine ink
Rhinestones: Basic Rhinestones by Stampin' Up! colored with Copic marker

I die cut the butterflies first and then added the colored cardstock behind it. I love how the colors peek out from behind the butterflies. I also like the 3-d effect the butterflies give.

I am hoping to make a few more cards using my dies- you can enter the contest by uploading up to 20 projects into thier community gallery. There are lots of great projects up there already, too!

Well, hope you are enjoying the last week of the year! Thanks for stopping by to take a peek today!

-tessa

Monday, December 26, 2011

Playing....

Just playing around on my new laptop! I am so excited to be blogging from my comfy couch! Hee! We had a great Christmas at our house- a low key one with nothing planned except for meals, games, and visiting some friends. It was perfect! Santa brought just what we all asked for- new bikes for the girls and laptops for me and my hubby! Just in time, too- I think our old desktop has had just enough of our trying to push it to do things!

Now that most of my gifts have been given, I can share some more of the homemade items I made. One, that was a big hit, was this great sugar scrub that I made:


I found the idea on Pinterest- which linked me to this recipe. There are only two ingrediants in this recipe and they were easy for me to find at Wegmans where I do my grocery shopping. I found the unrefined coconut oil in the beauty area in the natural/organic section of the grocery store. Later, I also found it in the baking area but it was almost double the price. I think I paid around $8.00 for my container.

I made myself a little pot as well and it's been great! It smells SO good- like an Almond Joy! And, I can already tell it's been helping with my dry hands and feet.

Anyways, just thought I'd pop on and blog cause I could! Hee! Hope you all had a great holiday! Thanks for stopping by today!

-tessa

Tuesday, December 20, 2011

Making Cash More Fun to Give...

Hello!

I hope you are all enjoying the last few days leading up to Christmas! We still have two more days of school and work to get through until our vacation starts but boy are we ready for it!

I wanted to share what I made for my nephews this year. They are older boys so every Christmas I send them money that they can take to the store and buy what they really want with. And, every year I try to come up with a different, fun way to give it to them. I mean, really, how much fun is it to open an envelope? Hee! I think I was pretty clever this year- I came up with this:


Fun, right? I hid the money inside the soap! I love that they'll have to use it to get their money out. Hee! Knowing my nephews though, I'm sure one will figure out a quicker way.

I bought some soap making supplies at Michaels- clear glycerin soap, green dye, and the mold. It was so easy to make- you melt the soap in the microwave, add your dye and stir. Then fill your molds half way and drop in your rolled up money. Let it set for 10 minutes and then fill the rest of the mold over the money. To keep the money safe, I rolled it tightly and put it into a tiny treat baggie and rolled it around the bills. I used a little scotch tape to hold it together but I wish it wasn't so obvious.


To decorate my little money soaps, I picked out these great whistling Santas from this years Cosmo Cricket holiday line- aren't they just perfect for this project? That is where I came up with the name, too- he just looked like he was hiding something! Hee! I punched them out and paired them with the my favorite red patterned paper from Bazzill Basics. I added the cherry cobbler baker's twine and a little tag stamped with holly and each boys' initial; all from Stampin' Up!


These were so fun to make and I hope that my nephews get as much joy out of them as I did! Now to think of something clever for next year...

Have a great day and thank you for visiting my blog!

-tessa

Saturday, December 17, 2011

Chocolate Covered Strawberries Card

My Stampin' Up! demo friend came by last week with her preorder goodies from the new Occasions Mini Catalog. So many cute things! She let me play with some of the great new products. There are wafer thin dies and embossing folders that match along with some great new stamp sets. I love them! Here is what I made:


Goodies:
All products by Stampin' Up!

Stamps: P.S. I Love You set
Ink: Real Red, Old Olive, Early Espresso, Crumb Cake, Soft Suede classic inks
Paper: Crumb Cake, Early Espresso, Naturals Ivory, Pink Pirouette cardstock; Real Red textured cardstock; First Edition DSP, Subtles DSP
Accessories: Basic Rhinestones, Early Espresso Baker's Twine, Crystal Effects, Labels Collection Framelits Dies, Adorning Accents Edgelits Dies, Adorning Accents Embossing Folders

The P.S. I Love You set is packed with so many great stamps! And what do you think of the new dies and embossing folders? I love them! They have a great design and I love the added texture that the embossing brings. If you end up with these, make sure you die cut the edge first and emboss second. It is easier to line up and won't squish your embossing.

Well, I hope you enjoyed my peek of this set! The Occasions Mini is out in January so keep an eye out for it!

-tessa

Tuesday, December 13, 2011

Fun Ruffled Flowers Card

Hello!

I've got a pretty card to share today- one with some fun, 3-D flowers! And, they are easy to make, too! Here is my card:


Goodies:

Kindness Matters stamp set, Basic Black ink, Sahara Sand cardstock, Scallop Edge punch, Circle punches, Scallop Circle punch and Wisteria Wonder ribbon by Stampin' Up!
Vintage Vogue Collection patterned papers, Spool Buttons, Ephemera, and Ribbon Trims; Nantucket Collection Clear Stamps by Pink Paislee
Vintage Rose Glimmer Mist by Tattered Angels


The flowers are so easy to make. To make the purple one, just take about half a yard of your favorite crochet trim and run a stitch through the bottom edge. Tie the ends of your string together to gather your trim into a flower. It will look great every time!

The scalloped paper flower is one of my all time favorite flowers to create. Just punch 4 scallop circles out of your favorite paper. Scrunch them each tightly into a ball with your hands- use a spritz of water if the paper is extra thick and tough to crinkle. Uncrinkle them and pile them on top of each other with your pattern facing up. Pierce a hole into the center, going through all of the scalloped circles. Add a brad to hold them together and then scrunch each layer around the brad until it is to your liking.

Not too hard, right? And they add so much texture to any project.

I'm going to be heading out the door shortly for an outing to Ikea! I love that store- so much inspiration and pretty things to buy! There is one in my town that I can go to when ever I want and I still get excited to visit. My girls have already put an order in for Swedish meatballs for dinner so I guess I'll be picking some of those up, too!

Hope you enjoy your day! Thanks for stopping by to take a peek!

-tessa

Monday, December 12, 2011

Happy Birthday Card

Hello!

Today is my mom's birthday! Happy Birthday Mom! Of course, I've made her a card- want to see? Here it is:


Goodies:

Grandma's Feather Bed patterns and cardstock by Bazzill Basics
Celebrate pattern by Teresa Collins Designs
Tag It die set by Lifestyle Crafts
twine by The Twinery
Create a Cupcake stamp set, Basic Black ink, and rhinestones by Stampin' Up!
Scallop Edge punch by Fiskars
Large Black Eyelets by We are Memory Keepers

I was inspired by my new Tag It die set by Lifestyle Crafts that I picked up recently- there are so many cute tags and little pop up shapes in the set. I am hoping to pull it out again soon to experiment with it some more. If I have time that is- my days have been going by so quickly lately and I haven't had much time to craft!

I'm glad I found a minute to post today! Thanks for stopping by!

-tessa

Monday, November 28, 2011

A Big Heart Card

Hello!

I'm having a very happy Monday today! My girls are in school and I have a day off from my babysitting job so I'm home alone for a few hours! Oh heaven! I loved having a wonderful long weekend with my family but I've got to say that a little bit of quiet is just what I need right now. I may even get a little crafty after I'm done typing this up! Hee!

Today I'm sharing a card I made just for fun using one of my favorite new stamp sets and some pretty papers from Stampin' Up! Here it is:


Goodies:
All products by Stampin' Up!

Stamps: Array of Sunshine set, Tiny Tags set
Ink: Pear Pizazz, Calypso Coral,Pink Pirouette, Basic Black, Crumb Cake classic inks
Paper: Crumb Cake, Confetti White, Poppy Parade cardtock; Pink Pirouette textured cardstock; 2010-2012 In Colors DSP; First Edition DSP
Accessories: Linen Thread, Jewelry Tag punch, Basic Rhinestones

The heart really stands out on this card. I cut it out freehand and then sanded the edges to give it a little more texture. The stamped flowers are so pretty! I love how versatile they are- great for backgrounds and for focal images.

Anyways, going to keep this short and sweet today- hope you have a great one!

-tessa

Sunday, November 27, 2011

Country Girl Page

Hi there!

I was going through my picture files and found this page I shared on the Scrapdoodles blog but I don't think I shared here...


Goodies:

paper: Country Drive line by Echo Park
wooden frames: Lil' Davis Designs (boy did I stash those a long time!)
letter stickers: Making Memories, Echo Park
cardstock stickers: Echo Park
pearls: Stampin' Up!

The picture is of Zoey when she was two... boy time goes fast! We were visiting my Dad's house in Snoqualmie, WA where I grew up. She loved that we could play outside for hours there. At the time, that was a luxury because we were living in a small apartment in the city.

We are having a great long weekend here! Today we're making plans for December and decorating our house with Christmas lights! We also caught the shopping bug and shopped till we dropped for 3 days straight! I caught lots of deals and saved over $500 by shopping the black Friday sales though- and I'm almost done with my Christmas lists! Yahoo!

Hope you are enjoying the last of your weekend! Thanks for stopping by to take a peek, too!

-tessa

Wednesday, November 23, 2011

Thankful Card

Hello!

Hope everyone is well today! I am- I love having short work weeks and long weekends, especially when we get to spend them with family and friends!

I have a card to share today- it was lots of fun to make mostly because I got to use paint and use a technique I hadn't tried before. I saw the technique on the Martha Stewart show- She and Patricia Arquette made these cool t-shirts with feathers printed on them. I thought they looked so cool and had to try the technique on a card! Pretty artsy fartsy, right? Hee! Here is my card:


Goodies:

paper: cardstock by Stampin' Up!; patterned paper by October Afternoon
fabric: Sticky Back Canvas by Claudine Hellmuth Studio
rubons: stitches by Studio Calico
letter stickers: Jenni Bowlin
paint: Adirondack Paint Dauber by Ranger
accessories: hemp twine and feathers- craft supply

Are you wondering how I did it? Here is a link to the Martha Stewart site with directions on how she did her shirts. I just used a piece of sticky back canvas instead of a t-shirt. I also tried it directly onto my card front which also worked out great. You can reuse the same feather a number of times and each print will come out differently. Make sure you have lots of clean scratch paper to press with though- if you use a dirty piece, you will end up pressing the mess right into your card!

Well, I hope you'll try this fun technique! If you do, please let me know- I'd love to see your printed feather projects!

Hope you have a wonderful Thanksgiving holiday as well!

-tessa

Thursday, November 3, 2011

Inky Holiday Greetings- an upcoming class


Hi there!

I'm excited to announce that I am one of three instructors teaching at the upcoming Scrapdoodles Retreat in Glen Allen, VA. Of course I will be teaching a cards class- just in time for the holidays! And these aren't just any holiday cards- these are packed with fun techniques that you will want to try over and over again! Take a look:


Fun, right? I can't wait to show you all these great techniques!

Here are the details:

Inky Holiday Greetings Class

Date: Saturday, November 19th
Time:3:30-5:30pm
Location: The Wyndham Virginia Crossings Hotel & Conference Center
1000 Virginia Center Parkway
Glen Allen, VA, 23059
Cost: $25.00
What to Bring: adhesive, foam adhesive (pop dots), scissors, paper trimmer, pencil, bone folder

My class is open to the public and if you'd like to come, please call Scrapdoodles at 540-548-3788 to sign up today!


Thursday, September 29, 2011

Watercolored Pear Card

Today I have another fall card for you! I've used the pear image in the Faith in Nature hostess set- a great pick if you ask me! Here is my card:


Goodies:
All products are by Stampin' Up! unless otherwise noted.

Stamps: Faith in Nature set
Ink: Peach Parfait, Lucky Limeade, More Mustard, Sahara Sand, Crumb Cake classic inks; Jet Black StazOn
Paper: Sahara Sand, Peach Parfait, Confetti White cardstock; First Edition DSP; patterned paper by Jillibean Soup
Accessories: Dotted Scallop Ribbon Border punch, Linen Thread, Spritzer; button- unknown

I watercolored the pear first and then spritzed and inked the background to make it a little more dingy. I think it would be fun to make a whole set of these cards, each with a different image as the focal point. I think that's what I'll do tonight while watching Greys Anatomy or Project Runway... I haven't decided yet which I want to watch! :)

Hope you have a great day!

-tessa

Wednesday, September 28, 2011

A Fun Banner Card

Hello!

I wanted to pop on and post a cute little card I made yesterday- My card mojo disappeared for a little bit and I made myself sit down and make something to urge it to come back! :) Here is what I made:


Goodies:

Stamps: Warmest of Wishes hostess set from Stampin' Up!
Ink: Lucky Limeade, Pink Pirouette, Peach Parfait classic inks by Stampin' Up!
Paper: cardstock by Bazzill; patterns by Jillibean Soup and Stampin' Up!
Accessories: letter stickers by KI Memories; die cut by Jillibean Soup; baker's twine, Dazzling Details, Mini Brad, and Crystal Effects by Stampin' Up!

I've been doing lots of fall cards lately but just felt like something different so I went for a fun, springlike pallet instead. It was just what I needed to kick my mojo up and hopefully now I can focus on my next project, Christmas card classes! I can't believe it's that time of year already!

Anyways, hope you enjoy your day!

-tessa

Monday, September 26, 2011

Haunted Houses

Hello!

I finished up a fun project over the weekend that I am so excited to share! They turned out really cute:


Fun, right? I don't usually do too much Halloween decorating but I've been wanting to make these houses since summer time. They were inspired by a set of houses the Stampin' Up! convention attendees had a chance to make and I saw them online. I loved them and knew I had to make a Halloween set and hopefully a Christmas set, too! Here are some more detailed pictures:


I used a mix of My Minds Eye's Mischievous line and Echo Park's Apothecary line for the most part with some other bits and bobs thrown it, too. I stained the wood with Ranger's Distress Stains- don't they look cool? I love it!

These were really fun to work on and I decided to teach a class on it down at Scrapdoodles on October 8th. If you are interested in the details, please check out their blog for more information.

Thanks for stopping by to take a peek at my houses today!

-tessa

Monday, September 19, 2011

From our Disney Vacation...

Good morning!

My day is not starting out as I had planned- I've got both girls home from school (one sick and one for speech screening) and I'm feeling a little overwhelmed by the house full! I don't think anything on my to do list is going to be done today... I guess there is always tomorrow, right?

Today I am posting another page from our first day at Disney World. We went to Typhoon Lagoon and we loved it! They had a fun area just for little kids and these pictures were taken there on a cute little waterslide they had. The girls would go down and then run back up to the top to go again! Serious fun for these girls! Here is my page:


I used Echo Park's Splash line on this page. I sanded the edges and added a sprinkle of my white Mr. Huey spray just for fun. I also popped up some of my stickers. I know... very simple! I like how it turned out though.

OK! Gonna keep it short so I can go take care of these kiddos!

-tessa

Wednesday, September 14, 2011

Spicy Stripes for Fall

A quick post today before I run out the door to pick up Nat from preschool- You know I love the Spice Cake DSP and this card really shows it!


I used the Day of Gratitude set again on this... I am hoping to make some more fun, fall cards, too!

Anyways, hope you are enjoying your day!

-tessa

Monday, September 12, 2011

Wonderful Fabric Rosette Card

Hello!

Hope you had a great weekend! I did... It ended up being pretty busy but I still found a little time after the girls went to bed to make some new cards. I have a list of cards to make for some deadlines I have coming up and I've been having a hard time working on them... For some reason my mojo disappears when ever I get the products I want to use out. Not that they are bad products but they are winter products and I'm still not quite there yet! I want to have fun in this season just a little while longer! :) Instead of working on my to do list, I procrastinated and pulled out some pretty new goodies from Pink Paislee. Their new Vintage Vogue line has such a fun color scheme- I decided to play with it instead! Here is what I made:


Goodies:

Stamps: Friendly Phrases and Array of Sunshine by Stampin' Up!
Ink: Jet Black Staz On, Black cat eye
Paper: Basic Black cardstock by Stampin' Up!; Vintage Vogue patterns by Pink Paislee (mini pack)
Accessories: Delicate Doilies fabric, Dazzling Details by Stampin' Up!; Vintage Vogue Ephemera by Pink Paislee

The rosette fabric flowers are so fun to make- especially if you use those new glubers from Cosmo Cricket! You just tear a strip of your fabric and stick an end to the center of your gluber. Then you twist your fabric and tack it down as you go round and round... easy, right? I love how it turned out!

I'm hoping I don't procrastinate all week on my to do list... at least it's still only Monday! Hee!

I hope you have a great day!

-tessa

Friday, September 9, 2011

Soft Suede Christmas Card

Happy Friday!

Well, we have another 3 day weekend here- kids are home from school because of flooding! The rain has been non stop and doesn't look like it's planning to let up any time soon... I guess that means lots of arts and crafts for me and the girls!

I know we still have a ways to go until Christmas but I thought I'd post this card anyways. It was my favorite from my Christmas in July card class I held a few months ago. The design was inspired by Angie Tieman's card... cute, right?

Here it is:


Goodies:
All products by Stampin' Up!

Stamps: Greeting Card Kids, Season of Friendship, Teeny Tiny Wishes
Ink: Soft Suede, Crumb Cake classic inks; Whisper White craft ink; Jet Black Staz On
Paper: Soft Suede, Crumb Cake cardstock; Vellum cardstock (the heavier one)
Accessories: Aqua Painter, Vanilla Smooch Spritz, Top Note die, Northern Flurry embossing folder, Crumb Cake seam binding, Linen Thread

I die cut the vellum with my Top Note die and then embossed it with the Northern Flurry folder. It tore a little bit but since my card has a vintage feel, I think it looks OK. For the main image, I stamped the girl first. Then I added the snowflakes and watercolored the snow at the bottom. I colored the girl in using Soft Suede to create some shadows. Last, I added the sentiment and inked around all the edges with my Crumb Cake ink. I built my card and spritzed everything with a heavy bit of Vanilla Smooch for a nice, glittery effect. The wrinkles in the seam binding are also easy to create- just tie your knot and then spritz some smooch or water in to your palm. work the ribbon ends around with your wet hand until they are saturated. Then pinch them up real good and they crinkle! Fun, right?

OK! There is my little share of the day... Now I'm off to build forts, practice my perler beading skills, and read books till the cows come home! Hope you have a great weekend!

-tessa

Thursday, September 8, 2011

School Girl Page

Good Morning!
I'm up early so I have time to post! We have lots going on this week so I haven't found much time to sit down at the computer. My girls started school this week- Zoey in 1st grade and Natalie in preschool. I only cried a little- how is it they get big so fast? Zoey loves her teacher and thinks it's cool that she's not the smallest one at school any more. Natalie is so excited that school is fun! She was really nervous about starting (it's her first time at preschool) and came home ready to go back so I think we're off to a good start! Here is a picture of them all ready to go yesterday- silly girls!


Since Back to School is fresh in my mind, I'm going to post a layout I did of Zoey's first day at preschool a few years ago:


I used products from last year's October Afternoon collections. The little Zz sticker is super old- my friend Dawnette gave me- Autumn Leaves maybe? I can't remember who made it... I am so glad I remembered having it though. It works well on this page!

I love how the layering turned out here. It's a perfect way to use up some of those scraps. I hand stitched around the frame- I haven't yet mastered my sewing machine but in this case, I wish I had- hand sewing this took a long time to do with all the layers!

Well, thanks for stopping by today!

-tessa

Thursday, September 1, 2011

Fall Frenzy Page

Hi! Hope you are all enjoying your week! I am looking forward to the weekend- mine is starting today, even though I am working tomorrow... my job at Scrapdoodles (my local lss) doesn't really count as work cause it's too much fun! :) I haven't had much crafty time this week so I thought I'd share something I made last winter- a scrapbook page:

What I love about this page is the diecut leaves! For some reason, I think they look so cute cut out of plaid papers!  I think maybe I'll make a card with some plaid leaves in it next time I craft. :)

I feel like I should also mention that I am planning on resigning from Stampin' Up!. Although I love the company and products, I don't think the at-home-business is for me right now. I gave the business a shot over the summer and was quite successful but putting so much effort into it left other parts of my day to day routine ignored. I've decided to just teach at my lss and hold local events seasonally. That means I have to give up being a demo so that I can post online about my upcoming classes and events. I've been teaching at Scrapdoodles for 3 years now and it feels good to be able to post about my projects again! Just because I won't be a demo doesn't mean I won't be using Stampin' Up!s great products though! They are still my favorite for stamps, inks, and cardstocks... and my downline just found her new best customer!
 
Thank you for understanding! I hope you have a great weekend!
-tessa

Tuesday, August 30, 2011

Scrapbooking my Disney Trip...

Hello!

This summer we were lucky enough to take our first trip to Disney World! We had the best time and of course, I took hundreds of pictures! It will probably take me the rest of this year and some of next to scrap all of them- hee! I started printing pictures a day at a time so I won't get overwhelmed. When I'm done with the first day, I'll print the next one up! I've had so much fun so far but I'm still only on the first day- we spent it at Typhoon Lagoon! :) Here is one of the layouts I've made:


Goodies:

Patterned Papers: Bo Bunny
Letter Stickers: KI Memories (I stashed those years ago!); American Crafts
Scallop Border and Circle Punches: Stampin' Up!

This page is a pretty simple layout infused with lots of bright patterned papers. The only fancy thing I did was build the red and orange flower on the bottom right. I cut and pasted 1/2" strips to the back of the circle to create it. I also sanded the edges so it would blend nicely with the rest of the page.

I've been inspired to scrapbook rather then make cards lately so I hope you don't mind the change of scenery while I share. I think it's good for me to change it up every now and then- I don't want to get burnt out!

So, now you've been warned! Lots of Disney layouts will be coming- lol!

Thanks for stopping by and I hope you have a great day!

-tessa

Thursday, August 25, 2011

Fun and Funky Fall Cards

Cropping down at Scrapdoodles on Saturday had one thing going that I can't get stamping at home- shopping! Hee! I didn't buy too much but I was so inspired by the new Amy Tangerine Line by American Crafts- I had to get it! Here are a few cards I made using mostly products from this line as well as those great leaf stamps from Stampin' Up!:


Don't you love the funky color scheme? I added some feathers, created a fabric flower (with the fabric paper) and sanded around the edges of my stickers to add some texture to my cards. I wanted to keep the designs simple though. What a fun line of product to play with!

So, things have been a little weird around here this week. I live in Northern Virginia so we felt the earthquake pretty good- I'm from Seattle and spent a few years in California before moving to the east so I knew what was going on. It was just unexpected and weird! We didn't have any damage so that is good! And, I got to teach Zoey and Natalie a science lesson about what causes earthquakes. Zoey was convinced that it was a giant bunny rabbit coming to get us! LOL! I think she got that from a Strawberry Shortcake movie we have!

We had quite a large aftershock last night, too. It woke me up just after 1am and I couldn't get myself back to sleep for a couple hours... I'll be taking it easy around the house today and adding an extra cup of coffee to the menu! Even now every rumble I hear has me on alert.

To top the week off, we get to watch out for a hurricane, too! I'm thinking we'll get the rain but not the full force of the winds but still... what a week!

Sorry for the rambling today. I blame the lack of sleep! Thanks for stopping by and listening, hee!

-tessa

Monday, August 22, 2011

Vintage Watercolor Card

Hello There!

Well, It's another Monday morning! :) We still have 2 weeks of summer break here and I am making the most of it! Today we're heading to the girls' favorite... Chuck E. Cheese... yes. I have been saying no to going all summer so today I'm going to surprise them! I can't wait- well, yes I can... you know how Chuck E. Cheese is! lol!

I cropped at my favorite lss over the weekend and had so much fun! I still can't believe i got so many things finished, too! I'm a pretty slow crafter and when I'm chatting all day with everyone, I turn into an super slow crafter! I still got 5 cards and 2 pages done! That is really good for me! :) Thanks to everyone at Scrapdoodles for the great day!

Here is a card I made:


I paired the On the Grow set with some pretty Echo Park papers. I watercolored the image and added crystal effects to the vase so it looks like glass. It's a prettier card in real life- at least I think so!

Well, I hope you enjoy your day! Thanks for popping over to take a peek!

-tessa

Thursday, August 18, 2011

Everyday Gratitude Card

Good Morning!

I've got another quick post of a card I made yesterday using the Day of Gratitude set along with my new favorite, Spice Cake DSP:


Goodies:
All Products by Stampin' Up!

The layout was inspired by a card I saw thumbing through the new Cards magazine... cute, right? There are so many inspiring layouts in their newest issue!

I've distressed everything a little with my Crumb Cake ink and tattered my ribbon a little as well. I love the look of it like that!

Anyways, I've got my hands full today so I'm going to keep this short!

Hope you have a great day!

-tessa

Monday, August 15, 2011

Another Fall Card

Good morning!

Hope you had a great weekend! I relaxed but my girls were gone for 2 whole days and I didn't know what to do with myself! My hubby and I enjoyed our time together but home was entirely too quiet with out them here.

Here is a card I made using my favorite new goodies from the upcoming Holiday Mini:


All products by Stampin' Up!

What a great color scheme for fall! I just love the touch of Pool Party thrown in to it- so fresh!

The leaf stamps were inked up with color then spritzed very lightly with Smooch spritz to give a little sparkle. I stamped them down and then added the outline over top before I cut them out. They are great stamps!

Is anyone taking the free Big Idea Festival class with Big Picture? It starts today and I'm joining in with the fun. I've never taken a class with Big Picture Classes and wanted to get a feel for some of the teachers there. I figure the best way to become a great teacher is to watch others do it so I'm excited to see what they have to offer!

Well, hope you enjoy your day! Thanks for stopping by!

-tessa

Friday, August 12, 2011

Fall Inspiration

I know it's not fall yet- and I'm still fully in summer mode- but when I get new fall stamps and paper in the mail, I just can't help but play! These goodies are sneak peaks of whats inside the new Stampin' Up! holiday mini- take a look:


Goodies:
All products by Stampin' Up!

The leaves are 2step stamps that give the impression of being watercolored. I love that! I spritzed mine with Shimmer spritz so that the ink would run a little, too. What do you think of that new DSP? It might be a new favorite for me! The colors are just perfect!

Well, I hope you are enjoying your day! Thanks for stopping by!

-tessa

Wednesday, August 10, 2011

A Bright Page and Card to Match!

Good morning!

I can't believe it's already Wednesday! This week is going fast and it's probably because we've been having so much fun! Today we're heading in to town to visit the National Zoo... one of my favorite places in Washington, DC. I can't wait! We're going to spend some time watching the meerkats play today- my girls have been addicted to watching Meerkat Manor on netflix this summer!

I've been crafting a little this week, too! I made this page and card out of some fun new goodies I got at the LSS I work at. Yes, I work at a scrapbook store- and I love it! I couldn't pass these cute papers by Echo Park up:

My Page:


A Closer Look:


A Card:

I think I bought every collection they've made this year! And that is saying something- I don't usually by collections of anything, just bits and pieces here and there. I seriously have a crush on this company! lol!

The layout was inspired by one from Kelly Purkey's Sketchbook3 class I took in the springtime- isn't it great!

The card uses the Array of Sunshine hostess set and boy does it have some pretty images! This was my first time using it and I can't wait to break it out again! I stamped the flower images with Versamark and embossed them with clear embossing powder. They look so nice and shiny!

Did you see this post on the Moxie Fab World blog yesterday? :) I was a trigger target! Yahoo! Pretty exciting for me!

Alright! Off to make a yummy picnic lunch for later. Hope you have a great day and thanks for stopping by to take a peek!

-tessa

Wednesday, August 3, 2011

A Tall Challenge Card

Well, I spent some time today crafting with my little girls- we practiced our watercoloring, a technique that my oldest daughter has been asking me to teach her! Hee! She's gonna be able to teach her own classes, soon! :) While they were busy painting their Sock Monkeys (yes, they like him, too!) I found time to play along with a fun challenge at the CAS-ual Fridays blog. The challenge was to create a 4x9 card with a CAS feel to it... well, I don't know if my card ended up being too clean or simple but the challenge still inspired me to try a different size! Hee! Here is what I made:


Goodies:
All products by Stampin' Up!

Stamps: Simply Soft, Tiny Tags, En Francais
Ink: Wisteria Wonder, Pear Pizazz, Crumb Cake classic inks
Paper: Crumb Cake, Soft Suede cardstock; Wisteria Wonder, Pear Pizazz textured cardstock, watercolor paper, First Edition DSP
Accessories: Scallop Edge Punch, Linen Thread, Jewelry Tag punch, Dazzling Diamonds, Aqua Painter, Color Spritzer

See? I think it's too distressed to be CAS... oh well! I love how it looks anyways and I don't think I would have attempted a card this size with out the challenge so thank you CAS-ual Fridays!


Want to see my cute girls in stampin' action? Here are a couple of pictures from our craft time together:


Awe! I love that they like to stamp as much as I do!

Thanks for stopping by today!

-tessa
 
site design by designer blogs